What is the 1-3-1 zone defense in basketball?
The 1-3-1 zone defense is a basketball strategy that seeks to disrupt offensive scoring opportunities by influencing contested jump shots and limiting dribble penetration, while executing solid on-ball defense.
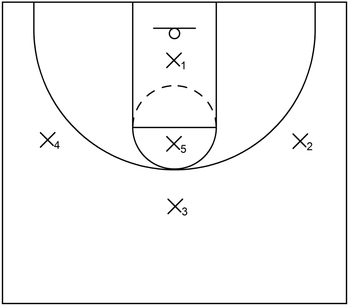
How to understand the player roles and diagrams on this page
In reference to any diagrams below, each of the offensive and defensive players are generally represented by the standard basketball positions, unless otherwise noted.
Additionally, offensive players are signified by numbers such as 1-5 while defensive players are indicated by the letter X, which is then followed by numbers such as X1-X5.
In essence, 1 and X1 indicate the respective offensive and defensive point guards. 2 and X2 signify the respective offensive and defensive shooting guards.
3 and X3 denote the respective offensive and defensive small forwards. 4 and X4 designate the respective offensive and defensive power forwards.
5 and X5 represent the respective offensive and defensive centers.
Also, in reference to general responsibilities, X1 executes defensive pressure against the player with the ball at the top and cover the high post areas.
X2 and X3 are to cover the wing areas or weak side areas while X4 and X5 cover the corner areas or guard the low post areas.
Moreover, in terms of a brief legend for the diagrams:
- Black Dot or Small Circle: The black dot or small circle represents the basketball.
- Solid Arrow: The solid arrow indicates movement or a cut on the basketball court.
- Dotted Arrow: The dotted arrow represents a basketball pass.
- Wavy Arrow: The wavy arrow indicates dribbling.
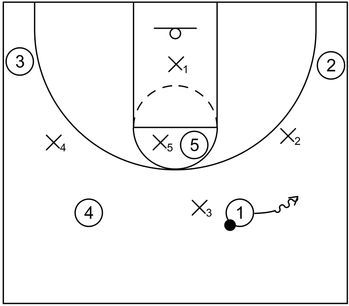
What is an example of the initial formation for the 1-3-1 zone defense?
X3 starts at the top above the three-point line. X2 and X4 start near the wings. X5 starts near the high post and X1 starts near the basket in the lane.
The responsibilities of X3 are to provide initial defensive pressure and attempt to influence the ball handler towards one side of the floor as a method of disrupting the offense.
Additionally, in certain instances, X3 could also help limit middle dribble penetration from the wing areas.
The responsibilities of X2 and X4 are to defend the wing areas and closeout on potential shooters if necessary. Also, in some instances, X2 and X4 could help limit middle dribble penetration from the corner.
The responsibilities of X5 are to cover the high post area and prevent high post entry passes when necessary. Additionally, X5 could defend against low post players as well.
The responsibilities of X1 are to primarily defend the corner areas. Furthermore, if a low post player receives the ball near the post block, then X1 could also help with a double team on that low post player.
It should also be noted that X1 is usually the point guard or another player that possesses an above average amount of speed/quickness, which will allow that same player the capability to closeout to the corners.
What are examples of 1-3-1 zone defense rotations?
Defenders of the 1-3-1 zone could rotate to certain areas of the court, mainly depending on where the ball is located.
When the ball is near the top
When the ball is near the top, the top defender could pressure the ball while other defenders cover the high post, wings, and the basket.
The example diagram below demonstrates this concept.
In essence, 1 has possession of the ball near the right slot area. As a counter to that, X1 applies defensive pressure and attempts to influence 1 towards the right side of the court.
At the same time, X2 and X4 cover the wing areas, X5 denies any entry passes into the high post, and X1 stays near the basket for the time being.
When the ball is on the wing
When an offensive player has possession of the ball on the wing, one of the zone defenders near the wing could guard the ball.
Also, the defender at the front of the zone could rotate back towards the ball side high post elbow area.
Other zone defenders could cover additional areas as well.
The example diagram below illustrates this in more detail.
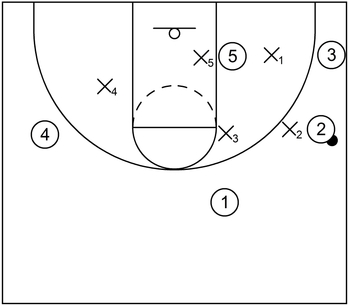
2 has possession of the ball on the wing. When that occurs, X2 covers the wing area while X3 could drop back and rotate towards the high post elbow to limit or deny dribble penetration towards the middle.
X5 should drop back to cover the low post area or protect the basket near the center of the lane. For this scenario, 5 is near the right side low post area so X5 should defend against that offensive player.
However, it should be noted that even if 5 was not near the low post area, X5 should still drop back to protect the basket in the lane.
For example, if 5 remained near the high post while the ball was near the wing area, X5 would drop back towards the basket and then X3 would deny the high post entry pass.
Additionally, X1 could stand in the gap between the low post and the corner and be prepared to closeout if the ball were to get passed to the corner.
Finally, X4 could drop back near the weak side mid-post area to watch for any possible basket cuts by 4. Also, X4 should also be ready to closeout if 4 were to receive a skip pass from 2.
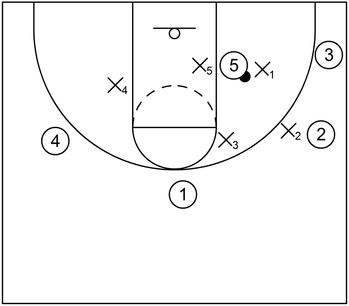
When the ball is in the corner
When an offensive player has possession of the ball in the corner, the backside zone defender could sprint and closeout on the ball.
Other zone defenders could cover certain gaps as well as provide basket protection, respectively.
The example diagram below showcases this concept.

This is an example of the 1-3-1 zone defense with the ball in the corner. When that occurs, X1 covers the corner and could contest a potential jump shot if necessary.
Also, X2 could help guard against middle dribble penetration while still ready to closeout if 2 were to receive the ball from 3. In addition to that, X3 continues to guard near the high post elbow while X4 continues to cover the weak side.
When the ball is in the low post
When an offensive player has possession of the ball in the low post, two of the zone defenders could execute double team action while the others cover certain areas.
The example diagram below demonstrates this in more detail.
5 gains possession of the ball in the low post. When that happens, X5 executes low post defense against 5.
At the same time, X1 helps double team the low post to influence 5 to pass the ball back towards the top, wing, or corner areas.
X2 continues to cover the wing area while X3 and X4 continue to cover the high post area and weak side respectively.
What are notable advantages of the 1-3-1 zone defense?
One particular advantage of the 1-3-1 zone defense is that the defender at the top executes defensive pressure against the player in possession of the ball.
When this occurs, the pressure could potentially cause the ball handler to play faster than usual, which in turn could lead to offensive disruption and eventual turnovers.
Additionally, the zone defenders that are positioned near the wings could place a hand into the passing lanes to limit or prevent easy wing entry passes by the ball handler at the top.
When this happens, the offensive team may have to initiate a different type of half court set than the original, which could also disrupt the flow of the offense.
Another advantage is that there is usually a defender near the high post areas which makes it much more difficult to limit the effectiveness of the zone defense by getting the ball into the middle, either by dribble penetration or via a high post entry pass.
What is a general disadvantage of the 1-3-1 zone defense?
One general disadvantage of the 1-3-1 zone defense is that it may not be as useful or simply ineffective against teams with above average shooters, especially from the corners behind the three-point line.
Basically, if an offensive player with good shooting ability is near one of the wings, then this will usually not be an issue because there is typically a zone defender positioned near those wing areas, at least most of the time.
However, if an offensive player with good shooting skills is near one of the corners, then this could become a potential issue because the corners are usually the most vulnerable spots within the 1-3-1 zone defense.
The reason this could become a problem is because the defender in the back of the zone has the responsibility of covering the corner spots.
However, if that same defender is not able to quickly execute a defensive closeout for whatever reason, then that could give the offensive team an opportunity to take an uncontested corner jump shot, particularly from three-point range.