What is the 2-1-2 zone defense in basketball?
The 2-1-2 zone defense is a basketball strategy that seeks to reduce offensive scoring opportunities, especially from low post areas, while also limiting dribble penetration and influencing perimeter shots.
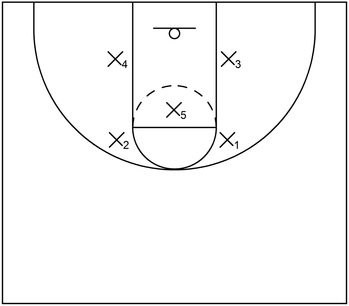
How to understand the player roles and diagrams on this page
In relation to any diagrams below, each of the offensive and defensive players are generally represented by the standard basketball positions, unless otherwise noted.
Additionally, offensive players are signified by numbers such as 1-5 while defensive players are indicated by the letter X, which is then followed by numbers such as X1-X5.
In essence, 1 and X1 indicate the respective offensive and defensive point guards. 2 and X2 signify the respective offensive and defensive shooting guards.
3 and X3 denote the respective offensive and defensive small forwards. 4 and X4 designate the respective offensive and defensive power forwards.
5 and X5 represent the respective offensive and defensive centers.
Also, in reference to general responsibilities, X1 executes defensive pressure against the player with the ball at the top and cover the high post areas.
X2 and X3 are to cover the wing areas or weak side areas while X4 and X5 cover the corner areas or guard the low post areas.
Moreover, in terms of a brief legend for the diagrams:
- Black Dot or Small Circle: The black dot or small circle represents the basketball.
- Solid Arrow: The solid arrow indicates movement or a cut on the basketball court.
- Dotted Arrow: The dotted arrow represents a basketball pass.
- Wavy Arrow: The wavy arrow indicates dribbling.
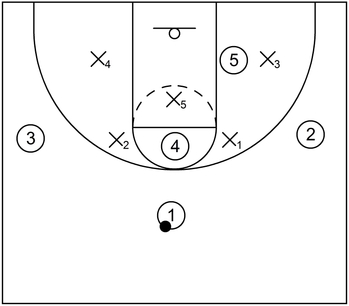
What is the initial formation for the 2-1-2 zone defense?
In reference to the initial formation for the 2-1-2 zone defense, it comprises two defenders at the front of the zone, one defender in the middle of the zone, and two defenders in the back of the zone.
Each of the zone defenders will cover certain areas of the court. X1 and X2 start near the high post elbow areas. X5 starts slightly below the free throw line in the key while X3 and X4 start near the low post areas.
In terms of responsibilities, X1 and X2 should generally cover the high post and the wing areas. X3 and X4 should generally cover the strong side corners and the weak side low post areas.
X3 and X4 could also double team the low post or temporarily cover the wing areas in some instances.
The primary responsibilities of X5 are to execute low post defense and protect the basket.
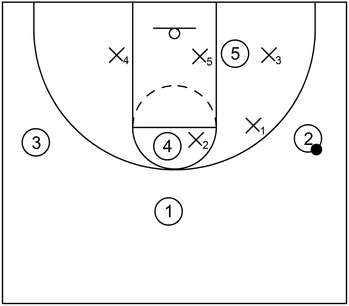
What is an example of the 2-1-2 zone defense when the ball is at the top?
When the ball is at the top, two topside defenders could cover the high post areas. Two backside defenders could cover near the low post areas. Additionally, a middle defender could cover the lane area just above the basket.
The example diagram below demonstrates this concept.
X1 and X2 cover the high post areas while X3 and X4 cover the low post areas. Also, X5 covers the middle area within the lane slightly below the free throw line.
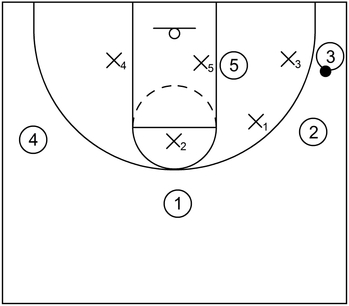
What is an example of the 2-1-2 zone defense rotation when the ball is on the wing?
When the ball is on the wing, one topside defender could cover the ball side wing while the other topside defender covers the high post area. One backside defender could cover the gap between the ball side wing and corner.
The other backside defender could cover the weak side low post area while the middle defender guards around the basket or ball side low post area.
The example diagram below illustrates this point.
X1 slides over to cover 2 while X2 slides over to cover the high post and deny the potential entry pass.
Also, X3 slides over a bit to stand in the gap between the wing and the corner. At the same time, X4 covers the weak side low post area.
Additionally, X5 drops back to cover the low post player and could front the low post as well.
What is an example of the 2-1-2 zone defense rotation when the ball is in the corner?
When the ball is in the corner, one backside defender could cover the ball while a topside defender stays near the wing. The other topside defender could also guard the high post as well.
The middle defender could guard the basket or near the ball side low post area while the other backside defender guards near the weak side low post area.
The example diagram below demonstrates this point.
X3 executes a defensive closeout to prevent an open jump shot or dribble penetration.
Additionally, X1 covers the wing while X2 covers the high post. X4 continues to cover the weak side low post while X5 continues to guard the low post player.
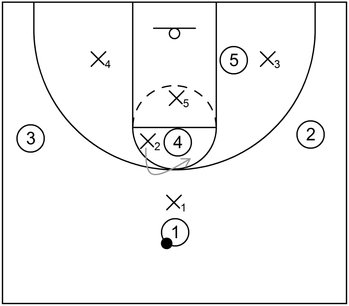
What is an example of the 2-1-2 zone defense rotation when the ball is in the low post?
When the ball is in the low post, a middle defender generally guards the player in possession of the ball. If feasible, a backside defender could also help double team the ball to influence a pass outwards to the perimeter.
The topside defenders could cover the ball side wing and high post area, respectively. The backside defender opposite the ball could cover near the weak side low post area.
The example diagram below showcases this concept.
X5 executes solid low post defense without fouling. Additionally, if there is an empty corner, then X3 could immediately double the post with X5.
If there is not an empty corner, then X1 could execute the double team action instead, assuming that 2 would be a below average perimeter shooter.
X2 continues to cover the high post while X4 continues to cover the weak side low post area.
What is an example of the 2-1-2 zone defense rotation when there is ball reversal from wing to wing?
When there is ball reversal from wing to wing, the topside defenders could rotate to the high post and opposite wing, respectively. A backside defender could lift up to temporarily guard the ball before shifting back down once a topside defender moves to that area.
The backside defender that is opposite the ball could guard near the weak side low post area while the middle defender could cover the basket or strong side low post area.
The example diagram below demonstrates this with more detail.
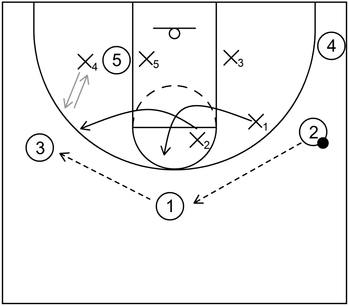
To start, 1 receives the ball from 2 and then 3 receives the ball from 1. When that occurs, X2 will probably not have enough time to shift from the high post to the left side wing.
Therefore, X4 alleviates this issue by moving to the front of the zone from the back area, mainly to temporarily guard the player in possession of the ball.
Afterwards, X2 should recover to the ball and bump X4 back to the original spot, represented by the gray arrows.
Additionally, X1 cuts to the high post area while X3 covers the weak side low post area. Also, X5 continues to guard the low post player, except this time, on the opposite side of the court.
What is an example of the 2-1-2 zone defense rotation when there is ball reversal from wing to opposite corner?
When there is ball reversal from wing to opposite corner, the topside defenders could rotate to the opposite wing and high post area, respectively. One of the backside defenders could lift up to momentarily guard the ball on the wing until one of the topside defenders moves to that location.
Furthermore, once the ball moves from wing to the corner, the middle defender could sprint towards the ball and closeout while the backside defender on the strong side slides back to guard the basket or low post area. Lastly, the backside defender on the opposite side could cover near the weak side low post area.
The example diagram below demonstrates this with more clarity.
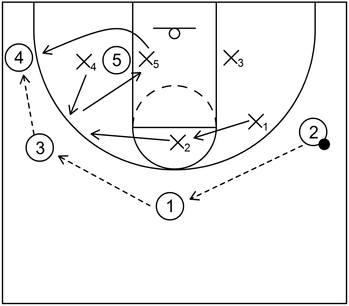
In essence, the offensive team has overloaded the left side of the floor. From that point, 2 passes the ball to the top, which is receive by 1. Afterwards, 1 passes it to the left side wing, which is received by 3.
Afterwards, X4 proceeds to temporarily closeout on 3 until X2 recovers and bumps X4 to the back of the zone. However, when that occurs, X4 would not have enough time to recover to the left side corner if 4 receives the ball from 3. Therefore, in that case, X5 will temporarily closeout on 4 instead.
What are examples of the 2-1-2 match-up zone defense variation?
The main objective of the 2-1-2 match-up zone defense variation is to provide a greater amount of defensive pressure against any player in possession of the ball, particularly near the top, wing, or corner areas of the court.
Furthermore, in the 2-1-2 match-up variation, the defense will typically emphasize ball denial, especially near the wings, corners, and/or high post areas.
The following example diagrams illustrate these points in greater detail.
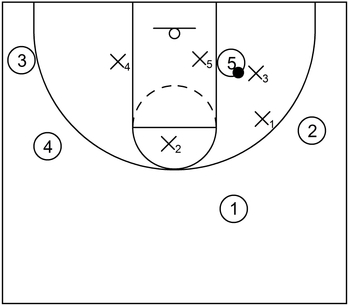
Part 1: Match-up when the ball is at the top
While an offensive player has possession of the ball at the top, one of the two top defenders will step out above the three-point line to apply defensive pressure.
Usually, the defender that applies initial pressure is one of the best perimeter defenders on the team and could also have above average speed and the ability to generate steals or deflections.
For this example, that defender is X1. Also, the other top defender X2 should cover the high post area and deny any entry passes to the high post player as represented by the gray arrow.
Part 2: Match-up when the ball is on the wing
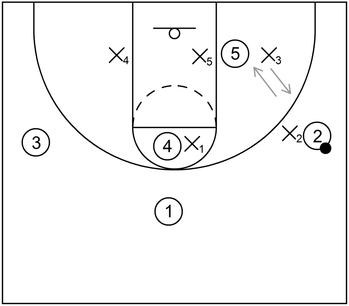
This is another example of the 2-1-2 match-up zone defense when the ball is on the wing.
In essence, 2 receives the ball near the wing and when that occurs, X3 could temporarily guard the right side wing until X2 recovers and bumps.
Afterwards, X2 should pressure the ball as much as possible without fouling. Also, X1 drops back to deny any high post entry passes to 4 while X5 guards the low post player. Additionally, X4 covers the weak side area.
Part 3: Match-up when the ball is in the corner
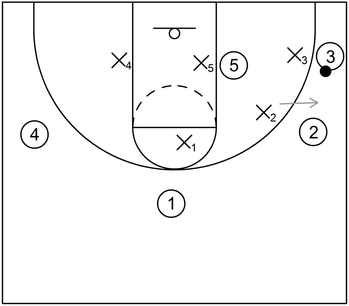
This is yet another example of the 2-1-2 match-up zone defense when the ball is in the corner.
X3 executes a defensive closeout to prevent an open jump shot or dribble penetration. Additionally, X2 has the option to execute denial defense, shown with the gray arrow, with a hand in the passing lane to prevent the easy pass back towards the wing.
X1 continues to cover the high post area while X5 continues to cover the low post. Furthermore, X4 continues to cover the weak side area as well.
What are general principles to consider for the 2-1-2 zone defense?
Limit or prevent low post touches
If the ball gets into the hands of a low post player with above average offensive skills, then that player could score quickly and efficiently against the nearest zone defender with a low post move.
Therefore, the defenders near the back of the zone could alleviate this problem by standing in the gap between the low post area and the wing/corner.
This will increase the difficulty for the offensive team to make an easy entry pass to the low post player.
In addition to that, if the ball does happen to get into the low post, then two of the zone defenders could execute a double team, which could influence the low post player to pass the ball back out towards the perimeter.
Use bumping during ball reversal
As mentioned previously, one of the primary disadvantages of the 2-1-2 zone defense is its susceptibility to perimeter ball reversal. However, the zone defenders could mitigate this problem to a degree by executing a technique known as bumping.
Essentially, when the ball gets reversed from wing to wing, one of the defenders in the front of the zone that typically covers the wing will usually not have enough time to recover.
If that happens, then it could lead to wide open perimeter jump shots or possible dribble penetration into the zone.
However, to counter those potential actions by the offensive team, one of the defenders in the back of the zone will step up towards the wing to temporarily cover that area.
Afterwards, the zone defender that is assigned to the wing area will bump the zone defender that temporarily covered that area to the back of the zone.
Limit or prevent uncontested jump shots
One of the main points of the 2-1-2 zone, like most zone defenses, is to influence perimeter jump shots. Nevertheless, this does not automatically mean that offensive players should be able to freely take uncontested jump shots.
Instead, the defenders of the 2-1-2 zone defense should always try to execute defensive closeouts with good footwork and contest jump shots, even from below average shooters.
This is especially important for the defenders near the back of the zone. These particular zone defenders should emphasize executing good closeouts to prevent open jump shots and/or limit dribble penetration, especially during ball reversal.