What is drop coverage in basketball
Drop coverage in basketball is a tactic utilized against pick and roll action that occurs when a defensive player, who initially guards the offensive player setting an on-ball screen, drops below that same screen, ultimately to limit scoring opportunities, especially near the basket.
Additionally, the offensive player setting the on-ball screen is generally referred to as the screener while the defensive player guarding that same offensive player is generally known as the screener’s defender.
What are basic examples of potential drop coverage areas
These are basic examples of potential drop coverage areas, which are also showcased within a 2 on 2 setting that consists of two offensive players and two defensive players.
Moreover, for demonstrative purposes, the offensive player indicated by the number 1 could be considered the point guard while the counterpart shown as X1 would be the defensive point guard.
Additionally, the offensive player indicated by the number 5 could be considered the center while the counterpart signified as X5 would be the defensive center.
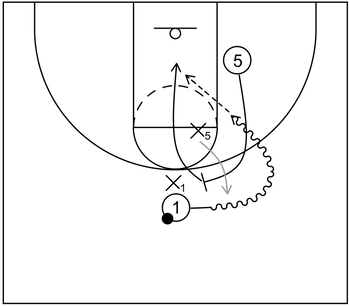
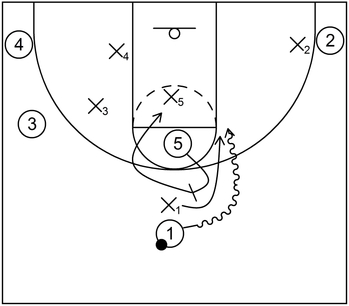
Screener’s defender begins the drop coverage at center of free throw line

In this basic example, the screener’s defender, indicated as X5, implements the drop coverage at the center of the free throw line, which is also referred to as the nail area.
Generally speaking, particularly at the time of on-ball screen action that happens near the top or middle of the court, the screener’s defender will typically initiate the drop coverage around this nail area, which could also be slightly above or under the free throw line.
The screener’s defender could also initiate the drop coverage action near the high post elbow areas as well.
In either case, the key principle to consider is that the screener’s defender will always stay below the screen itself during the execution of the drop coverage.
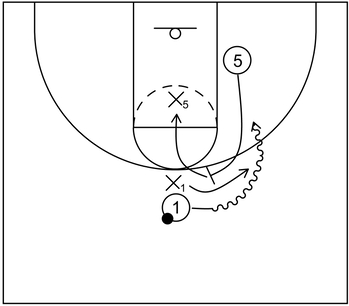
Screener’s defender begins the drop coverage slightly above free throw line

This is another example of the drop coverage as a counter to offensive pick and roll action.
This time, the screener’s defender, indicated as X5, initiates the drop coverage slightly above the free throw line as opposed to directly on the nail or within the lane.
This particular variation might be effective if the offensive team is setting a very high drag screen during their transition offense or the offensive team is simply setting a high on-ball screen that is further away from the three-point line.
Additionally, the screener’s defender could also set up near this area slightly above the free throw line as alternative drop coverage, particularly when the screener prefers to roll but the offensive player who would be the recipient of the screen is confident enough to take the potentially available jump shot.
More details of the alternative drop coverage will be covered in a later section below.
When should the defensive team consider using the drop coverage
Offensive players involved in the screening action possess below average jump shots
The defensive team could consider using the drop coverage when the two offensive players involved in the ball screen/pick and roll action possess below average jump shots.
Essentially, when the drop coverage is implemented by the defense, the usual objective is to limit or prevent easy scoring opportunities directly at the basket, particularly layups and/or dunks.
When that happens though, the trade-off is potential jump shots for the offensive team.
However, if the players involved in the screening action are not very good in terms of taking jump shots, then that would be favorable to the defense, especially as it relates to executing the drop coverage.
Screener commonly prefers to roll
The drop coverage could also be utilized in situations where the screener commonly prefers to roll to the basket as opposed to popping towards a perimeter area for a potential jump shot opportunity.
In general, the screener will almost always try to roll to the basket, especially if that player is possesses a sub-par jump shot or that player is simply a non-shooter who is not comfortable taking field goal attempts outside of the lane area.
Conversely, if the screener does practically roll to the basket each time but the screener’s defender does not execute the drop coverage, then the screener could potentially score at the basket, which is detrimental to the defense.
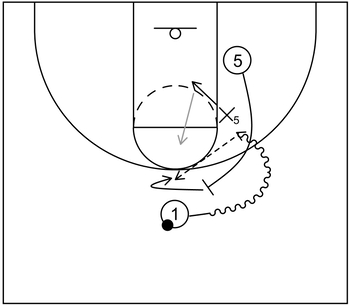
The basic diagram below attempts to illustrate this point.
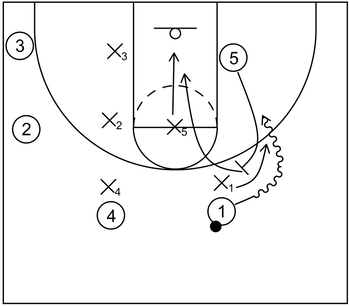
Screener gets to the basket while there is no drop coverage
On the diagram, X5 attempts to hedge above the on-ball screen as shown via the gray arrow as opposed to staying below it in the drop coverage.
However, X5 starts the hedge action too late, which allows 1 to dribble towards the basket while 5 runs straight to the rim.
Furthermore, X5 cannot recover in time as 5 is already too far ahead near the basket. Following that, 5 receives the ball from 1 and scores at the rim via a layup or dunk.
It is also noteworthy to mention that if 5, or any other player who would be the screener’s defender in the ball screen/pick and roll action, does not possess enough speed and quickness to properly execute the hedge, then that player and/or the coaching staff should strongly consider using the drop coverage instead.
Why is the drop coverage potentially effective for the defensive team
Mitigates effectiveness of roll action by screener
The drop coverage is potentially effective for the defensive team because it mitigates the effectiveness of the roll action by the screener.
In essence, when the screener rolls to the basket, the screener’s defender who executes the drop coverage should be in the vicinity of the rolling pathway that would be taken by the screener.
The basic diagram below attempts to illustrate this point.
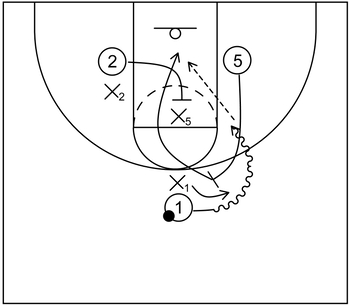
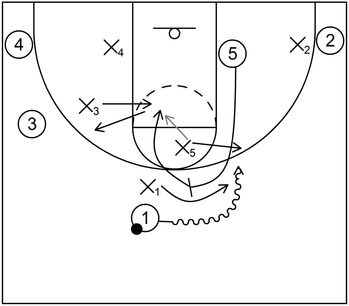
Screener’s defender impedes the screener’s path to the rim
On the diagram, 1 uses the on-ball screen while X1 fights over the top of it and around the same time, 5 attempts to roll to the rim.
Nonetheless, a straightforward route to that destination gets impeded by the drop coverage of X5 who is already in the lane waiting on 5.
Potentially limits dribble penetration
The drop coverage can also potentially limit dribble penetration by the player that uses the on-ball screen, who ultimately desires to attack the rim to score themselves or possibly throw a kick pass to a teammate for another possible scoring opportunity.
Basically, the screener’s defender could backpedal towards the lane area while simultaneously containing the player in possession of the ball and protecting the basket.
The diagram below seeks to demonstrate this concept.
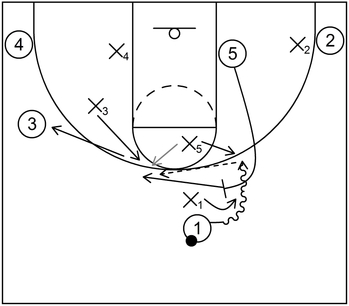
Screener’s defender can backpedal if necessary

On the diagram, the screener’s defender initially starts the drop coverage near the right side high post elbow area.
Nevertheless, when 1 dribbles toward the basket while X1 fights over the top of the screen, X5 can backpedal, which is shown with a gray arrow, towards the lane area.
By doing this, X5 essentially takes away the capability of 1 to get all the way to the basket. Furthermore, at the same time, X5 basically dares 1 to take a mid-range jump shot instead.
Additionally, by backpedaling, X5 can essentially cut off the ability of 5 to get all the way to the rim as well.
In essence, while implementing the drop coverage, especially in this particular scenario, the screener’s defender is able to play a type of pseudo zone defense by guarding the general area around the free throw line or high post elbow as well as the lane/paint area.
Furthermore, it should also be noted that even if 5 receives the ball from 1, which is shown with a gray dashed arrow, that action basically becomes a 1-on-1 sequence between 5 and X5.
In that instance, it is possible that 5 would be able to take a well-defended close-range shot, but this is generally better for the defensive team in terms of percentages than a free run to the basket.
In other words, there is typically a lower probability of 5 making a contested hook shot in the lane when compared to an uncontested layup or dunk that is directly at the rim.
What are possible disadvantages of the drop coverage
Susceptible to pick and pop action
One particular disadvantage of the drop coverage is that it is susceptible to pick and pop action by the screener.
Essentially, the screener could counter the drop coverage by popping to an area near the perimeter as opposed to rolling to the basket.
Afterwards, the screener could receive the ball and potentially have an opportunity to take a wide open jump shot, particularly from three-point range.
Moreover, if the screener’s defender does not possess an adequate amount of speed to execute a good defensive closeout towards the screener who popped, then that could also be a problem for the defensive team.
The following diagram seeks to demonstrate this concept.
Screener pops to a perimeter spot
On the diagram, 1 uses the screen set by 5 and as that happens, X5 executes the drop coverage near the right side high post area.
Furthermore, X5 backpedals into the lane to hinder further dribble penetration by 1.
However, as the backpedal action happens, 5 pops toward the top behind the three-point line instead of rolling to the basket.
When that occurs, X5 could attempt to closeout, which is shown with the gray arrow.
Nonetheless, because there is too much initial distance due to the backpedal action, X5 most likely would not be able to swiftly closeout and fully contest a potential open jump shot that could be attempted by 5.
Vulnerable to potential jump shot by player that uses the screen
Another notable disadvantage of the drop coverage is that it is vulnerable to the jump shot that could be taken by the player that used the on-ball screen.
Essentially, after utilizing the screen, the player in possession of the ball could attack the drop coverage by simply dribbling into the gap between their own defender and the screener’s defender.
Following that, that same player could then take the open jump shot. Again, this could be an issue for the defense, particularly if the player in possession of the ball has the capability to make open jump shots.
The basic diagram below attempts to illustrate this point.
Player that uses the on-ball screen has a potential open jump shot

As 1 dribbles toward the lane via the on-ball screen set by 5, there is a gap in the space between X1 and X5.
This essentially gives 1 at least a small window of time to raise up for a jump shot, which is shown with the wide arrow.
It should be noted though that it is possible for X1 to fight through the screen and get a hand up to potentially contest the jump shot taken by 1.
Nevertheless, if 1 possesses an above-average jump shot, especially within the mid-range, that contest may be too little too late.
Potentially ineffective if opposing team counters with a back screen
Another noteworthy disadvantage of the drop coverage is that it could become potentially ineffective if the opposing team counters with a back screen, especially by way of Spain pick and roll action.
In essence, the offensive team could utilize a certain player (usually a guard) to set a back screen on the screener’s defender during the timing of the roll action.
Following that, if the screener’s defender gets caught on the back screen, then the screener would typically have a much easier opportunity to roll to the basket and possibly score near the rim with a layup or dunk.
The diagram below strives to demonstrate this action.
Opposing team uses Spain pick and roll to diminish potency of drop coverage
The simple diagram features 3 on 3 action and adds in two new players, indicated as 2 and X2, who would be the offensive shooting guard and defensive shooting guard respectively.
To start the action, 1 uses the on-ball screen set by 5 and begins to dribble towards the lane.
At the same time, X5 is already within the lane executing the drop coverage so that 5 cannot easily get a free run to the basket and 1 cannot fully attack the rim.
However, to counter the drop coverage, 2 steps behind X5 in the lane to set a back screen.
As a result, 5 can get open near the basket, receive the ball from 1, and then score via a layup or dunk.
It should be mentioned as well that even if X2 were to switch onto 5 in this instance, there would still be a high probability that a mismatch would occur.
This is primarily because 5, who plays the role of the center position, is usually taller and/or stronger than X2, who is the defensive shooting guard.
What are examples of drop coverage within 5 on 5 action
These are examples of drop coverage that is slightly more detailed than previous diagrams, which contain five offensive players and five defensive players.
In addition to that, each offensive player has a number that relates to standard basketball positions and each defensive counterpart has a similar corresponding number, which would be denoted alongside the letter X.
So, 1 is the offensive point guard while X1 is the defensive point guard.
2 is the offensive shooting guard while X2 is the defensive shooting guard.
3 is the offensive small forward while X3 is the defensive small forward.
4 is the offensive power forward while X4 is the defensive power forward.
Lastly, 5 is the offensive center while X5 is the defensive center.
Example 1: Drop coverage within the lane
This is an example when a player has possession of the basketball at the top and the screener’s defender starts the drop coverage within the lane area below the free throw line, ultimately to limit the effectiveness of roll action by the screener.
Additionally, the defensive team desires that the offensive player in possession of the ball takes a jump shot as opposed to getting dribble penetration in the lane.
To start, 1 dribbles toward the basket via the on-ball screen set by 5. As that occurs, X1 fights over the top of the screen and chases after 1.
Next, 5 rolls to the basket but X5 counters that roll action with the drop coverage below the free throw line. So, from that point, the defensive team prefers that 1 would take the jump shot.
However, if 5 receives the ball from 1 and attempts to score in the lane, then X5 is already in that area ready to defend against a potential close-range shot.
Example 2: Drop coverage at center of free throw line
This is an example of the drop coverage initially at the center of the free throw line when an offensive player has possession of the ball in the slot area and there is an empty corner as well.
To begin, 1 dribbles toward the basket via the on-ball screen set by 5.
As that occurs, X1 fights over the top of the screen while X5 stays in position to contain dribble penetration if necessary.
Afterwards, 5 rolls to the basket and when that happens, X5 backpedals to stay in front of 5, which also helps to limit the effectiveness of the roll action.
Example 3: Alternative drop coverage #1
This is an example of alternative drop coverage when a player has possession of the ball is at the top.
In essence, if there is a situation where the screener prefers to roll and/or the screener is simply a non-shooting threat but at the same time, the player who uses the screen has enough confidence to take the jump shot that would be available in the gap of the defense, then this modification of drop coverage could be potentially beneficial.
To provide more clarity, as the screener rolls to the basket, the screener’s defender will immediately attempt to contain the player in possession of the ball closer to the three-point line as opposed to waiting near the high post/free throw line area and/or backpedaling into the lane to hinder dribble penetration.
Additionally, because the screener’s defender is not already within the lane or backpedaling into it, another defender on the weak side (in this case, it is the wing defender) will execute help defense that consists of tagging the screener who rolls to the basket.
The main purpose of the tag is to slow down the momentum of the roll action by the screener. After that, the screener’s defender will recover to the initial assignment.
To start, 1 dribbles toward the basket via the screen set by 5. Next, X5 immediately contains 1 just inside of the three-point line to prevent a potential open jump shot while X1 fights through the screen and chases after 1.
From there, after setting the screen, 5 rolls to the basket. However, X3 mitigates the effectiveness of the roll action by tagging 5.
At the same time, X5 sprints back and recovers to guard against 5, which is represented by the gray arrow. Furthermore, X3 also recovers to guard against 3.
Example 4: Alternative drop coverage #2
The is another example of alternative drop coverage when a player has possession of the ball at the top.
However this time, instead of rolling to the basket, the screener pops to a perimeter location behind the three-point line.
When that occurs, the screener’s defender will probably not have enough time to closeout and contest the possible jump shot from the screener.
To alleviate this potential problem, a weak side defender, preferably near the wing area, executes help defense by stunting at the ball and then quickly recovering to the original assignment.
By performing this stunt and recover action, this gives the screener’s defender enough time to recover to the screener.
Moreover, the stunt action could be used as a way to bait the screener into passing the ball to the stunting defender’s original assignment.
On the diagram, 1 dribbles toward the basket via the screen set by 5. After that, X5 immediately contains 1 just inside of the three-point line to prevent an open jump shot while X1 fights over the top of the screen and chases after 1.
Next, 5 counters the drop coverage by popping to the perimeter area behind the three-point line near the top after setting the screen.
At that moment, X5 will probably not have enough time to closeout and contest the potential jump shot by 5.
Therefore, X3 stunts at 5 to discourage the possible jump shot before recovering back towards 3 near the left side wing area.
Following that, X5 quickly recovers to 5, represented by the gray arrow.
Related: Drop Part 1 – The Basketball Dictionary
Related: Drop Ball Screen Basketball Defense Coverage – YouTube