What is youth basketball offense?
Youth basketball offense generally consists of various actions that can help young basketball players score points near the basket or near the perimeter areas of the court.
How to understand the player roles and diagrams on this page
In reference to any diagrams below, each of the offensive and defensive players are generally represented by the standard basketball positions, unless otherwise noted.
In essence, 1 and X1 indicate the respective offensive and defensive point guards.
2 and X2 signify the respective offensive and defensive shooting guards.
3 and X3 denote the respective offensive and defensive small forwards.
4 and X4 designate the respective offensive and defensive power forwards.
5 and X5 represent the respective offensive and defensive center positions.
Moreover, in terms of a brief legend for the diagrams:
- Black Dot or Small Circle: The black dot or small circle represents the basketball.
- Solid Arrow: The solid arrow indicates movement or a cut on the basketball court.
- Dotted Arrow: The dotted arrow represents a basketball pass.
- Wavy Arrow: The wavy arrow indicates dribbling.
- T-Shaped Symbol: The T-shaped symbol signifies a screen, also known as a pick.
- Double pipe symbol: The double pipe symbol denotes handoff action.
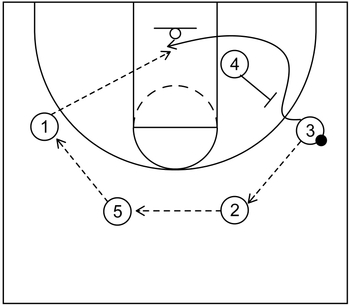
What is an example of youth basketball offense initiated from 3 out 2 in motion?
This is an example of 3 out 2 in motion for youth basketball offense set that includes a down screen and a continuity pattern.
This particular set could be useful for youth basketball teams with at least two low post players who are good at setting screens.
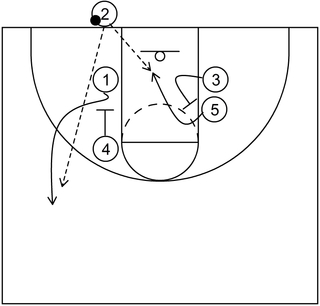
Part 1: Pass and cut
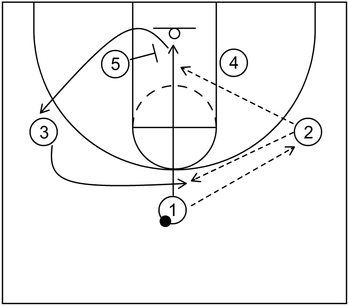
To begin, 2 receives the ball from 1 and afterwards, 1 cuts to the basket. Following that, 1 could receive the ball again from 2 and then score at the rim. This particular sequence is also known as a pass and cut or give and go action.
Following that, if 1 is not open, then 3 cuts to the top while 1 fills the left side wing via the pin down screen set by 5. From there, 3 receives the ball from 2 and after that, the offense could be executed again as a continuity pattern.
Part 2: Continuity pattern
Next, 1 receives the ball from 3 who cuts to the basket. Afterwards, 3 could receive the ball from 1 again and score at the rim. Otherwise, 3 cuts to the right side wing via a pin down screen set by 4.
At the same time, 2 cuts to the top and could receive the ball from 1. From there, the continuity pattern would run again until the players attempt a shot.
What is an example of youth basketball offense initiated from 4 out 1 in motion?
This is an example of 4 out 1 in motion for youth basketball offense that includes a back screen, which could also be considered a flex screen set at an angle.
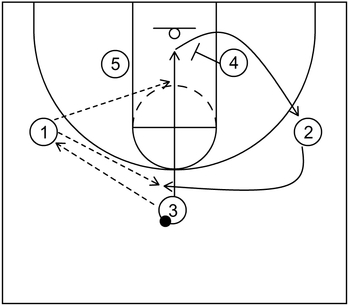
Part 1: Back screen
To start, 1 executes a slot to slot pass with 4 as the recipient. Afterwards, 4 performs a slot to wing pass with 3 as the receiver. From there, 2 cuts to the basket via the back screen set by 5.
Following that, 2 receives the ball from 3 and scores near the basket. Otherwise, 2 continues the cut through to the right side low post area while 5 fills the left side wing area.
Part 2: Exchange cuts
From this point, the motion offense will shift into a continuity pattern but first the off-ball players should perform exchange cuts.
Essentially, 2 cuts to the right slot while 4 moves down to the right side low post area. At the same time, 1 cuts to the left side wing area while 5 cuts to the left slot area.
Part 3: Continuity pattern
Next, 2 receives the ball from 3 and then 5 receives it from 2. After that, 1 receives it from 5 and as that occurs, 3 cuts to the basket via the flex screen set by 4.
From that point, 3 receives the ball from 1 and scores via a layup around the basket.
What is an example of youth basketball offense initiated from 5 out motion?
This is an example of 5 out motion for youth basketball offense that focuses on passing between perimeter spots and cutting to the basket.
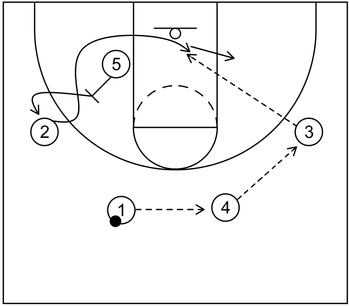
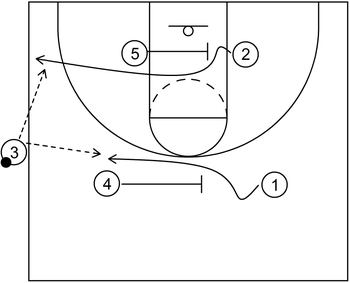
Part 1: Top to wing pass
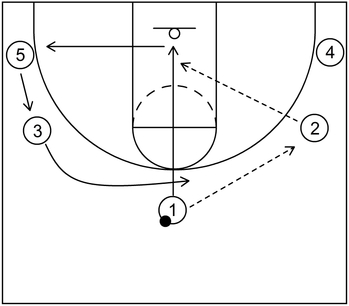
To start, 1 passes the ball towards the right side wing with 2 as the recipient. After that, 1 cuts to the basket and at the same time, 3 cuts to the top and 5 fills the left side wing area.
1 could receive the ball from 2 if that is open and score via a layup. Otherwise, 1 could cut through to the left side corner.
Part 2: Wing to top pass

Next, 3 receives the ball from 2 and immediately after that, 2 cuts to the basket. At the same time, 4 fills the right side wing previously occupied by 2.
2 could receive the ball from 3 if that is open and score at the rim. Otherwise, 2 could cut out towards the right side corner.
Part 3: Continuity pattern
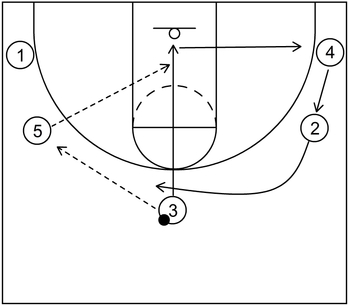
At this point, the offense could flow into a continuity pattern. Therefore, the pass and cut action could be performed again on the opposite side of the floor.
5 receives the ball from 3 and after that, 3 cuts to the basket. At the same time, 2 cuts to the top and 4 fills the right side wing.
3 could receive the ball from 5 if that is open and score at the rim. Otherwise, 3 could continue and cut through towards the right side corner.
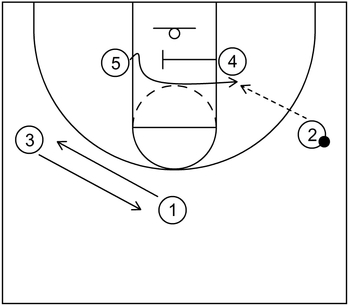
What is an example of youth basketball offense featuring a backdoor cut?
This is an example of a simple backdoor cut for youth basketball offense, which could lead to a high-percentage layup.
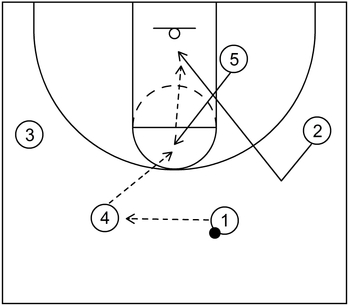
To start, 4 receives the ball from 1 and as that occurs, 5 flashes to the high post area near the center of the free throw line.
Next, 5 receives the ball from 4 and then 2 quickly executes a backdoor cut towards the rim. Following that, 2 receives the ball from 5 and quickly scores at the basket.
What is an example of youth basketball offense featuring pick and roll action?
This is an example of pick and roll action for youth basketball offense that includes a perimeter and interior scoring option. It also begins with a 1-4 low alignment.
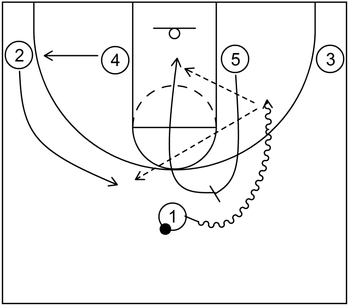
To start, 1 dribbles toward the basket near the right side of the court by way of the on-ball screen set by 5.
Next, 5 rolls to the basket and at the same time, 4 pops out to the corner while 2 lifts up near the left slot area.
From there, 5 could receive the ball and score near the rim or 2 could receive the ball and take the three-point shot if open.
What is an example of youth basketball offense featuring a quick hitter?
This is an example of a quick hitter for youth basketball offense. It involves down screens and cross screens to create a scoring opportunity around the perimeter or near the basket.
Moreover, prior to the main action, the offensive players also set up in a box alignment.
Part 1: Down screens
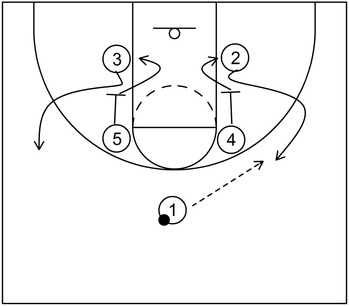
To begin, 2 and 3 cut to the left side and right side wings via the down screens of 4 and 5. After that, 2 receives the ball from 1 and could take the three-point shot if open.
However, 3 could receive the ball as an alternative option. Furthermore, 4 and 5 fill and replace at the low post areas after setting the down screens.
Part 2: Cross screen and exchange cuts
Next, if 2 is not open for the shot attempt, then 5 could cut to the right side low post area via a cross screen set by 4.
Following that, 5 could receive the ball from 2 and score near the basket. Also, 1 and 3 could perform exchange cuts between the top and wing areas to occupy the defense.
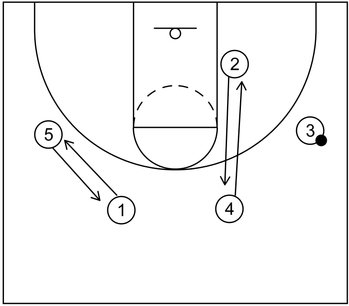
What is an example of youth basketball 2-3 zone offense?
This is an example of youth basketball 2-3 zone offense. It includes a flash cut from the low post area and dive cut from the corner area.
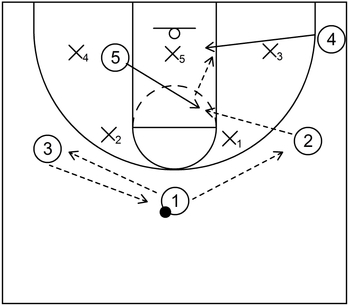
To start, 3 receives the ball from 1 and quickly reverses it back to 1. The main objective of this ball reversal action is to shift the zone defenders.
Next, 2 receives the ball from 1 and as that happens, 5 flashes into the middle of the 2-3 zone defense. Also, at the same time, 4 dives to the basket from the right side corner.
Following that, 5 receives the ball from 2 and could take the mid-range jump shot if open. Alternatively, 5 could pass the ball inside with 4 as the receiver, which could result in a scoring opportunity near the basket.
What is an example of youth basketball offense featuring a baseline out of bounds play?
This is an example of a very simple baseline out of bounds play that can lead to a high percentage shot around the basket.
To start, 5 cuts into the lane via the back screen set by 3 and at the same time, 1 cuts to the perimeter via the down screen set by 4.
Following that, 5 could receive the ball from 2 and score near the basket. Also, 1 could receive the ball as an alternative option and then initiate other offensive sets from there.
What is an example of youth basketball offense featuring a sideline out of bounds play?
This is an example of a very basic sideline out of bonds play that could result in a quick perimeter-based shot.
To start, 2 cuts to the left side corner via the screen set by 5. Also, at the same time, 1 cuts toward the left slot area via the screen set by 4.
Following that, 2 could receive the ball from 3 and take the three-point shot if open. Also, as a secondary option, 1 could receive the ball from 3 and take the open jump shot or initiate other offensive sets.
What is an example of youth basketball offense featuring a press breaker?
This is an example of a simple press breaker for youth basketball offense ran against a 1-2-1-1 press defense.
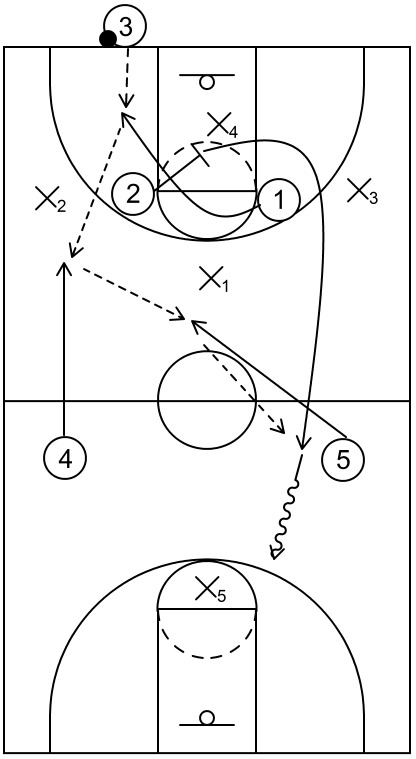
To start, 1 cuts to the strong side via the screen set by 2 and then afterwards, 1 receives the ball from 3.
As that occurs, 4 cuts toward the ball, 5 cuts toward the middle of the floor, and 2 runs down the opposite sideline after setting the screen. Next, 4 could receive the ball from 1.
After that, 5 could receive it from 4 and then 2 could receive it from 5. Following that, 2 should try to get downhill and dribble ahead of X5 or take the open mid-range jump shot if X5 retreats to protect the basket.
What is an example of a youth basketball passing drill?
This is an example of a youth basketball passing drill, which also focuses on developing passing, catching, and hand/eye coordination.
For this drill, the youth players could practice the fundamental passes such as the chest pass, bounce pass, and overhead pass.
This drill also emphasizes ball movement via ball reversal, which could be useful against man to man or zone defense.

To start, 2 receives the ball from 1 and then quickly passes it to 3. After that, 2 receives the ball again from 3 and then reverses the ball to 1.
Next, 5 receives the ball from 1 and then passes it to 4. Afterwards, 5 receives the ball again from 4 and quickly reverses it back to 1.
From there, the drill can continue for a certain amount of time and/or pass attempts between the players.
What are general concepts and principles to consider for youth basketball offense?
Spacing
When executing youth basketball offense, the players should try to be spaced apart about 12 to 15 feet. Essentially, if each player gets positioned near one of the court spots mentioned in the previous section, then this is representative of good spacing.
For example, if the point guard or primary ball handler is at the top, two players on each of the wings, and two players are in each of the corners or near the low post blocks, then the players have achieved good spacing.
Conversely, as another example, if the point guard or primary ball handler is at the top but two players are near the right side wing, then this is representative of bad spacing.
It is important for the players to have good spacing because it would be easier to execute actions such as screening or cutting and it will make it more difficult for one of the defenders to cover two offensive players in a sort of pseudo-zone defense.
Ball and player movement
With youth basketball offense, it is essential for the players to pass the ball to other teammates, primarily via ball reversal whenever necessary. This ball movement action will cause the defense to shift and potentially breakdown which would be beneficial for the offensive team.
Furthermore, it is of equal importance that the youth players do not just stand in place after passing to a teammate. Instead, the players should execute a basketball cut, particularly towards the basket when necessary or set a screen for a teammate.
If the youth basketball players are able to understand the basic concepts of ball movement and player movement, then this could lead to offensive scoring opportunities.
Good shot selection
Another benefit of ball and player movement is that it could lead to good shot selection, which are high percentage shots that players can make. If youth basketball players are able to take and make capable shots, then this could also boost their confidence and help them to continue developing their basketball skill sets.
Basketball positions
The standard basketball positions are typically known as the point guard, shooting guard, small forward, power forward, and center.
The point guard is usually the team’s primary ball handler and offensive initiator. The shooting guard is usually the team’s best shooter/scorer. The small forward is typically the team’s secondary shooter/scorer and this player could also have rebounding capabilities.
The power forward is usually one of the team’s tallest players and is generally good at gathering rebounds and scoring points, either near the basket, from the mid-range, or from three-point territory.
The center is typically the team’s tallest player, best rebounder and low post scorer. Additionally, the center is usually the team’s best rim protector defensively.
In terms of youth basketball offense, particularly with younger players, the coaching staff could either assign certain positions to each player or use more of a position-less approach.
If the coaching staff does decide to assign positions, then each player should have that assigned position based on their respective strengths.
For example, if one of the youth players is great at dribbling the ball, especially with either hand, then that player could be assigned the point guard position.
Also, if the coaching staff is not sure which players are good at what skill sets, then the coaches could either allow the players to play against each other in a scrimmage or the coaches could have the players run different types of drills to determine the players’ abilities.
This could also help the coaches to learn which skills need to be developed as well. However, it should also be noted that the coaching staff should not pigeonhole the players into certain types of roles, especially on offense, based solely on the players’ position.
For example, if the coaching staff assigns a certain player as the team’s center, then that player does not necessarily only have to score around the basket if they can also score near the perimeter.
Similarly, if the coaches designate a certain player as the team’s point guard, then that player should not only have the role of initiating the team’s offense and passing to other teammates if that player has the ability to either shoot near the perimeter or drive to the basket.
Also, if one or more players can play multiple positions, then the coaching staff could utilize that as a strategy too.
For example, if one of the team’s guards has the ability to dribble or shoot, then that player could get assigned either role depending on the situation or the roles of the other teammates on the court at that time.
Furthermore, if the coaching staff implements certain types of motion offense such as 5 out, then the players could swap positions during the flow of the offensive sequence.
In other words, the players would be playing in more of a position-less type of system as mentioned earlier. In any case, it is important for the coaches to allow the players to develop different types of skills that works best for each player.
Pivoting
A pivot foot is the first foot that touches the floor upon receiving and controlling the basketball. However, if both feet were already touching the floor, then either foot could become the pivot foot.
In either case, once a pivot foot gets established, it cannot be lifted from the floor and re-established again without dribbling the basketball, passing to another teammate, or shooting a jump shot.
If a player does lift the pivot foot and then puts it back down again without dribbling, passing, or shooting, then that would be considered a traveling violation.
In terms of youth basketball offense, if the players are able to grasp the basic concepts of pivoting, then this knowledge could be used to cut down on turnovers, particularly from traveling violations.
Additionally, by learning how to use the pivot foot, youth players would be able to turn their bodies away from the defender while protecting the basketball, particularly during a pressure defensive situation.
This, in turn could make it more difficult for the defensive team to get steals or takeaways, which also leads to reduced turnovers for the offensive team.
Furthermore, over time, players could learn to use the pivot foot to execute certain types of basketball moves such as a no-dribble jab step (with the non-pivot foot) which could be used to fake in one direction and then dribble in the other direction.
Also, the players could use that same no-dribble jab step to simply create space for a possible jump shot.
To get a general feel for pivoting, youth players could start by standing on both feet as normal about shoulder width apart. Afterwards, slightly bend the knees with the back straight and then lift one foot from the floor.
This is now the non-pivot foot. Next, the players could begin to slowly turn the other foot, which is now the pivot foot, until they make a full circle.
Also, it should be noted that players do not have to always keep the non-pivot foot from touching the floor while turning the pivot foot. Instead, the players could turn the pivot foot little by little.
To analogize this type of movement with the pivot foot, it could be something like 90 degree angles or something like an analog clock where the pivoting starts at 12 o’ clock, then turns to 3, then to 6, then to 9, and finally back to 12.
This method could hopefully help youth players get a basic feel for using the pivot foot and possibly assist players with foot balance as well.
Also, it should be mentioned that when pivoting, players should be on the balls of the foot and not standing flat footed as this could make pivoting more difficult, less efficient, and it could also potentially lead to them becoming unbalanced, especially if they attempt to pivot on the heels of the feet.
Additionally, while pivoting, players cannot slide the pivot foot from one spot on the floor to another spot. In that case, although the player may not have lifted the pivot foot from the floor before dribbling, passing, or shooting, this is still considered illegal movement and is therefore, a traveling violation.
Related: Forward Pivot Drill – YouTube
Shooting
Shooting is one of the fundamental skills within the game of basketball. If players cannot shoot the basketball, then it most likely would be challenging to score points consistently so it is very important for players to always find time to practice shooting.
In terms of basic shooting mechanics, youth players should start close to the basket as opposed to around the perimeter. Also, the youngest players should start practicing shooting mechanics on lower rims if possible.
Next, players should place the dominant hand (i.e the shooting hand) behind the basketball with the non-dominant hand (i.e. the guide/balance hand) near the side of the ball.
Also, players’ thumbs should make a shape similar to an L or upside-down T while holding the ball. Additionally, players should spread the fingers apart at a comfortable distance and grip the ball with the pads of the fingers.
Players should not hold the ball in the palm while trying to shoot as this would most certainly lead to inconsistent and/or inaccurate shot percentages.
Next, players should place the ball near the hip area, with the feet about shoulder width apart and their eyes on the rim.
Players could also have the dominant foot slightly in front of the non-dominant foot as long as the players have both feet towards the rim.
At the same time, players should tuck in the shooting elbow so that it is aligned with the center of the rim. Following that, players should bend the knees, keep the back straight, and at the same time, place the ball slightly above the forehead with eyes still on the rim.
Next, players could jump in the air, release the ball above the rim, snap the wrists, and follow through with an extended elbow towards the basket.
It should also be noted that players should execute shot attempts with one fluid down-and-up motion as opposed to multiple movements which could lead to inconsistent shots.
Also, as for jumping in the air, players could take a small hop, also known as a set shot, or a larger jump. It really depends on what feels comfortable for the player.
Furthermore, on the jump action, players could also jump a little bit forward while shooting as long as their feet are still towards the rim. Again, it depends on what is comfortable for the player.
Additionally, as for shooting free throws, players do not necessarily have to jump in the air. However, they should still use the down-up fluid motion while rising up on the balls of the feet when shooting. This particular movement with the feet is also known as plantar flexion in medical terms.
Related: Fundamentals of Shooting – YouTube
Passing
The fundamental passes for youth basketball players include the chest pass, the bounce pass, and the overhead pass.
Chest pass
The chest pass is the most common pass in basketball and it is usually the easiest one for young players to execute. This type of pass could be used in almost any situation provided the target of the pass (i.e. another teammate) is open to receive it.
These are the typical steps to execute the chest pass:
First, the player grips the ball near the chest area with both hands on the side of the ball. Smaller players such as a 6 or 7 year old could also place the non-dominant hand on top of the ball for better grip and control, if necessary.
Second, the player takes one step toward the target, usually with the dominant foot. Third, the player extends the arms, snaps the wrists, and releases the ball towards the target’s chest area.
Fourth, the player follows through with the fingers spread towards the target and the thumbs pointing in a downward direction.
Bounce pass
The bounce pass is another common pass in basketball. However, it might take youth players, particularly the very young ones, more time to efficiently execute this type of pass when compared to the common chest pass.
This type of pass is typically good for situations in which a target is open to receive the ball but it is too risky to throw the standard chest pass.
As an example scenario, a player with the ball would like to throw a chest pass to an open teammate. However, that player’s defender has their hands high in the passing lanes which means it is too risky to throw the chest pass because that could lead to a deflection and/or turnover.
Therefore, the player with the ball decides to throw the bounce pass below the hands of the defender to the open teammate with minimal or no risk that could result in a deflection or turnover.
These are the typical steps to execute the bounce pass:
First, the player grips the ball near the chest/stomach area with both hands on the side of the ball. Smaller players such as a 6 or 7 year old could also place the non-dominant hand on top of the ball for better grip and control, if necessary.
Second, the player takes one step toward the target, usually with the dominant foot. Third, the player extends the arms, snaps the wrists, and releases the ball with enough strength towards a spot on the floor between themselves and the target.
Fourth, the player follows through with the fingers spread towards the target and the thumbs pointing in a downward direction.
If the player bounces the ball with the proper amount of strength, then the ball should bounce up towards the target’s chest/stomach area. However, if the player bounces the ball on the floor without enough strength, then the ball will most likely be too low and the target would have to bend down to receive it.
Also, if the player bounces the ball on the floor with too much strength, then the ball will most likely be too high and the target might have to reach higher than the chest/stomach area to receive it.
Therefore, the player should consider practicing the bounce pass a number of times to determine the right amount of strength needed for the ball to bounce up towards the target’s chest/stomach area.
Overhead pass
The overhead pass is typically used to move the ball faster than the standard chest pass or bounce pass. Additionally, the overhead pass is generally executed when the passer is far away from the target.
For example, in the half court setting, the overhead pass could be used to quickly skip the ball from one side of the floor to the opposite side.
Another example could be when a player gets a defensive rebound and then executes the overhead pass towards a target further down the court such as with a fast break situation.
Also, the overhead pass could be used in certain instances when the passer is not too far from the target but the defense executes a type of defensive pressure that makes it more difficult to execute the chest pass or bounce pass.
For example, if the defender pressures up on the passer with their hands covering the passer’s chest/stomach area. In that case, the passer could simply execute the overhead pass over the head (no pun intended) of the defender to the target.
These are the typical steps to execute the overhead pass:
First, the player grips the ball slightly over (or above) the head with both hands on the side of the ball. Also, the player should not place the ball directly behind the head or neck area when attempting the overhead pass as a defender could knock the ball loose and cause a turnover. Furthermore, placing the ball too far behind the head/neck could slow down the velocity of the ball which would make the overhead pass ineffective at best.
Second, the player takes one step toward the target, usually with the dominant foot. Third, the player extends the arms, snaps the wrists, and releases the ball towards the direction of the target.
This could be directly to the target’s chest area or ahead of the target such as a situation where the target could be cutting towards the basket. Fourth, the player follows through with the fingers and thumbs pointing downward.
Related: Bounce, Chest, and Overhead Pass – YouTube
Cutting
The fundamental cuts to consider for youth basketball offense would generally be the straight cut, the backdoor cut, the v-cut, and the fill cut.
Also, these cuts are typically used with continuity/motion offenses so they could get executed multiple times while creating scoring opportunities for the players.
The straight cut occurs when the player cuts straight to the basket as the name implies. The fill cut occurs when the player cuts to an empty space on the floor. In other words, they would be filling a space that was unoccupied by another teammate.
The backdoor cut occurs when the player cuts to the basket, usually as a counter to being denied the ball by the defense.
Also, the V-cut occurs when the player cuts toward the basket from the perimeter but then pops back out in the shape of a V on the court, and then receives the ball from a teammate.
Screening
The primary types of screens to consider for youth basketball offense would be the back screen, the cross screen, the down screen, and the on-ball screen.
The back screen occurs when an offensive player sets a screen for a teammate behind that teammate’s defender.
The cross screen occurs when an offensive player cuts across the lane near the low post to set a screen for a teammate. Additionally, a player could set a screen for a teammate across the high post as well.
The down screen occurs when an offensive player turns toward the baseline to set a screen for a teammate, who would then cut towards the perimeter.
The on-ball screen occurs when an offensive player sets a screen for a teammate with the ball.
Afterwards, the player that set the screen would either roll to the basket, also known as pick and roll, or pop to an area near the perimeter, also called pick and pop.
Dribbling
When dribbling the basketball, players should control and dribble the ball with one hand at a time. If players attempt to dribble with both hands at the same time, this is considered a double dribble violation. Also, players should dribble with the pads of the fingers and not with the palm of the hand.
Additionally, players should try to stay low and protect the ball, particularly when the defense is executing on-ball pressure. Furthermore, players should try to keep their eyes up to see the court and the other players on the court.
If players are always looking down at the ball, then they will not be able to see the defense who could potentially steal the ball as well as teammates who could be open for scoring opportunities.
Also, players should learn how to dribble efficiently with the dominant hand as well as the non-dominant hand.
If players are only proficient with the dominant hand, then defenders will most likely try to force the player to use the weaker non-dominant hand which could lead to ineffective dribbling and/or turnovers.
Related: Fundamentals of Dribbling – YouTube
The fundamental dribble moves for youth basketball offense include the crossover dribble, the between-the-legs dribble, and the behind the back dribble.
Crossover dribble
The crossover dribble occurs when the player dribbles the ball from one hand to the opposite hand. Also, in the process of switching the ball to the opposite hand, the player will typically step in one direction before executing the crossover.
For example, the player initially dribbles with the right hand, takes one step towards the defender with the right foot (as if to dribble in that direction), then bounces the ball on the floor to the left hand while moving in that same direction towards the left.
A very basic drill to learn the crossover dribble is to stand in one spot with the feet shoulder width apart, knees slightly bent, and the back straight.
Next, the player simply crosses the ball over from one hand to the other. The player should dribble from one hand, to the floor, and then to the opposite hand in the shape of a V.
Between the legs dribble
Between the legs dribble occurs when the player dribbles the ball with one hand, then bounces it on the floor between the legs, and afterwards, catches the ball with the opposite hand.
A simple drill to learn the between-the-legs dribble is to place the feet slightly beyond shoulder width apart, bend the knees, and straighten the back.
Next, the player dribbles the ball on the floor between the legs and catches it with the opposite hand. Afterwards, the player could center the ball back in front and repeat the same move over and over.
Another variation of the drill is to dribble the ball between the legs, catch it, but afterwards, dribble the ball back between the legs with the opposite hand.
With this variation, the player dribbles the ball continuously without bringing the ball back to the front to start over. This is also a great way to strengthen the wrists and develop finger pad control.
Behind the back dribble
Behind the back dribble occurs when the player dribbles the ball with one hand behind the back, bounces it on the floor, and then catches it with the opposite hand.
With the behind the back dribble, the player should dribble from one hand to the other in the shape of a V, similar to the crossover dribble.
One basic progression for learning the behind the back dribble is for the player to sit in a chair and dribble under the legs without looking at the ball.
While this is not an actual behind the back dribble, it is a very good way of getting a feel for the ball when it is not in front of the player.
Affiliate Disclosure: I may earn a commission on qualifying purchases made through the link below.
Related: A Hierarchy of Individual Skills for Youth Basketball – John Tauer