General definition of roll and replace in basketball
Roll and replace is a basketball tactic that occurs when one offensive player rolls towards the basket from a perimeter area of the court, particularly after setting an on-ball screen, while another offensive player replaces towards the perimeter from an area near the basket.
Basic examples of roll and replace action
This section includes basketball diagram examples that demonstrates roll and replace action. It should also be mentioned that the offensive and defensive players on the subsequent diagrams do not have specified roles at this time and are simply denoted via numbers such as 1, 2, 3, X1, X2, etc.
Example 1: High screen

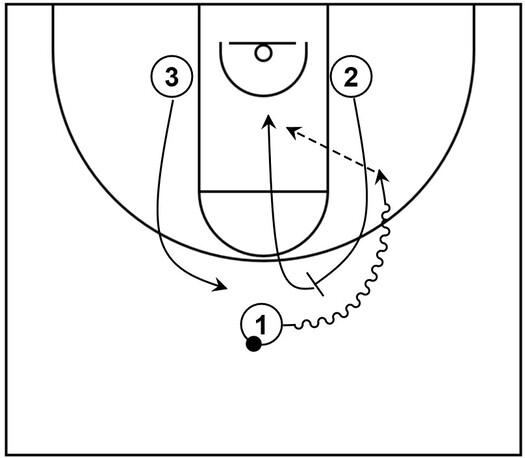
This is a basic example of roll and replace action featuring a high screen, a type of on-ball screen, commonly implemented within basketball offenses that utilize the pick and roll.
For the setup: 1 is at the top with possession of the ball, represented by the black dot; 2 fills the right side low post area; 3 occupies the left side low post area.
To begin, 2 cuts toward the top to set the basic high screen, represented by the T-like symbol.
Next, 1 then uses that on-ball screen and begins dribbling the ball towards the basket, indicated by the wavy arrow.
As that happens, 2 rolls toward the basket down the middle of the lane area while 3 replaces near the top where 1 was previously stationed and where 2 set the screen.
Following that, 1 could pass the ball, represented by the dotted arrow, with 2 as the recipient.
Afterwards, 2 could simply score at the basket by way of a layup or dunk.
Example 2: High screen and high low option

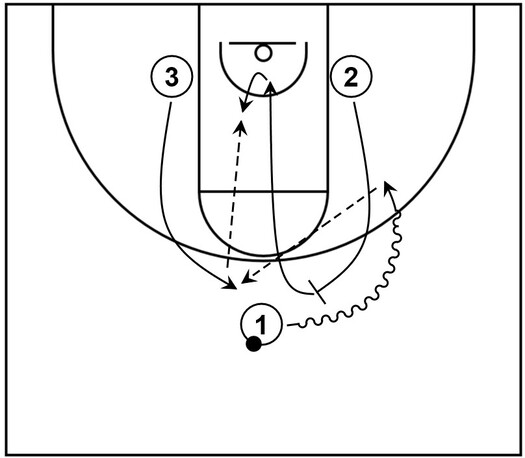
This is a basic example of roll and replace action that consists of a high screen as well as high low action, which could lead to a scoring opportunity around the rim.
The initial setup is similar to the previous diagram with 1 occupying the top while 2 and 3 fill the low post areas.
To start, 1 uses the high screen set by 2 who also rolls to the basket afterwards. At the same time, 3 replaces at the top.
Next, 3 could receive the ball from 1 at the top. From that point, if 3 is open, then that could result in a three-point shot.
Alternatively, if 3 is not open or 3 simply does not attempt the field goal, then 2 could quickly turn while inside of the lane with their back to the basket, ready to receive the ball.
Afterwards, 2 could receive the ball via high low passing action from 3 and then swiftly try to score by way of a close-range shot in the lane, indicated by the wide arrow.
Example 3: High screen with defenders

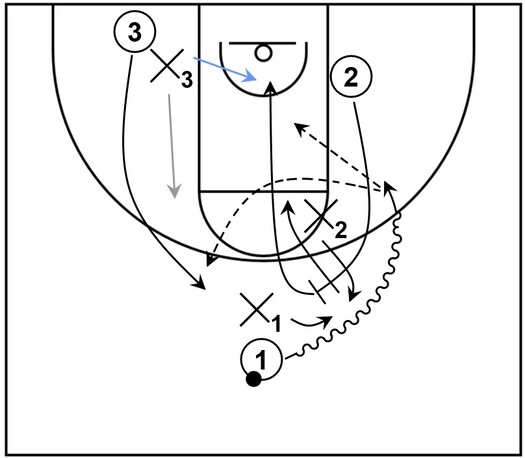
This is another example that seeks to demonstrate the potential effectiveness of roll and replace action featuring the high screen in addition to defensive players indicated as X1, X2, and X3.
In reference to the initial setup, 1 and 2 begin near the top and right side low post area respectively while 3 occupies space near the dunker spot for the time being.
1 uses the high screen set by 2 and as that occurs, X2 attempts to soft hedge approximately parallel with the screen to hinder the dribbling action of 1.
However, 1 is able to continue dribbling towards the basket while X1 fights over the screen and chases behind.
Moreover, as the soft hedge happens, 2 rolls to the basket so X2 would not able to immediately recover, which means 2 would be open for an easy layup at the rim.
Therefore, to stop that type of high percentage scoring opportunity from occurring, defensive teams would generally have one of their weak side defenders, usually the lowest defender who is the closest to the baseline, known as the low man, tag the roller momentarily.
This not only impedes the roll itself and prevents the roller from getting a wide open look at the rim, but it also gives the hedging defender more time to recover.
On the diagram, the low man is X3 who tags the roller (2) diving towards the basket.
However, this is where the primary benefit of roll and replace action can come into play.
If X3 tags the roller (indicated by the blue arrow) while X2 is recovering towards that same roller, but at the same time, 3 replaces towards the perimeter, then at the very least in theory, 3 would be open to receive the ball from 1. That could also lead to a three-point shot.
Conversely, if X3 does not tag the roller but instead stays attached to 3 (indicated by the gray arrow) who would be cutting toward the perimeter, then that would put more pressure on X2 to recover more quickly after the hedging action.
However, if X2 does not possess an above average amount of speed, then that could present a challenge for the defense.
Putting it another way, if X3 does not tag the roller and X2 is not fast enough to recover, then 2 would be open to receive the ball from 1, which could result in a layup at the rim.
Most of the time though, defensive teams would probably chose to tag the roller as that eliminates or at least hinders the offensive team from getting a high percentage shot directly at the rim.
It should be mentioned though that in some instances, defensive teams may decide to not tag the roller, especially if the defender executing the hedge is very fast and/or if that defender has a speed advantage over the roller.
In other words, the defensive team knows that their hedging defender can recover quickly and/or is faster than the offensive player who would be rolling to the basket.
Another instance where a defensive team may choose to not tag the roller during the hedge action is if they are aware that the offensive team needs a three-pointer to tie the score such as during the last seconds of a game.
Basically, the defensive team might decide to potentially give up two points if they would still win by one point.
It should be noted as well that the diagram only demonstrates roll and replace action with three defenders.
However, within actual 5 on 5 action, defensive teams may employ other pick and roll defense tactics, particularly defensive switching to impede on-ball screens as well as roll and replace.
Additional insights about roll and replace action
It should be noted that the player executing the replace action should not cut towards the perimeter too early as that can give the opposing team an opportunity to counter with defensive switch rotations.
Basically, the screener/roller’s defender could switch with the replacing player’s defender or if that is not feasible, another help defender on the weak side could switch with the replacer’s defender.
Similarly, the replacing player should not cut towards the perimeter too late as that could give that player’s defender an opportunity to momentarily guard two offensive players. That being the replacing player and the roller.
Essentially, if the replacing player were to move towards the perimeter too late while the rolling player is already cutting within the lane, then the replacing player’s defender, who would probably be responsible for tagging the roll man would be able to hinder the roll (via the tag action) and still recover in time towards the replacing player cutting to the perimeter.
That off-timing would then cause the roll and replace action to be ineffective at best and completely useless at worst.
Additionally, when the replacing player cuts towards the perimeter, it should always be on the opposite side of the roller’s path to the basket.
Essentially, if the replacing player does not cut on the opposite side of the roller’s path, then it would result in inadequate spacing.
Furthermore, it would also make it much more easier for the replacing player’s defender to slow down the offensive player who would be rolling to the basket while still being able to effectively guard the replacing player.