Introduction
Hoop Student features offensive/defensive concepts including strategies, plays, and drills as well as other noteworthy insights within the game of basketball.
The section below contains brief details about newly published material and/or recently updated content throughout the site.
Additionally, more links can be found within the Offense and Defense web pages as well as within the Glossary.
1-4 high pick and roll plays

1-4 high pick and roll plays comprise various actions that emphasize creating scoring opportunities near the basket or around perimeter areas of the court.
Baseline runner plays
Baseline runner plays feature an offensive player who primarily cuts from one side of the court to the other side by way of the baseline, ultimately to get open as demonstrated on the adjacent diagram below.

Player 3 runs via the baseline from the corner to the opposite wing making use of various screens to get open and receive the ball from player 1.
Side pick and roll plays
Side pick and roll plays comprise an on-ball screen that is set by one particular offensive player generally facing towards a sideline for a teammate who has possession of the basketball near a wing area as shown via the image below.

For the diagram above, 1 and 5 execute side pick and roll action, which could lead to various scoring opportunities.
Hybrid positions
A hybrid position is a special type of basketball position that generally combines attributes of one typical basketball position with attributes of another standard basketball position.

The diagram above demonstrates pick and roll action that involves one of the hybrid positions, represented by the number 2 in this instance.
3 on 3 basketball plays
3 on 3 basketball plays feature one or more actions designed for three players on the court such as demonstrated on the diagram below.

The basic 3 on 3 play above primarily features UCLA action, particularly the UCLA screen, which could result in a scoring opportunity near the basket.
1-3-1 zone offense plays
The 1-3-1 zone offense plays web page is published. At this time, it features a couple of basketball plays with one or more scoring options such as demonstrated via the diagram below.

This is an example of a 1-3-1 zone offense play initiated from a stack near the lane line and post area that also features screens among other actions.
Curl cut
The curl cut page is available. It comprises action that happens when an offensive player moves from one area of the court to another by way of a curling or curving type of motion. The diagram below demonstrates an example of the curl cut.

Essentially, an offensive player utilizes a curl cut towards the basket after a screen is set by a teammate. The cutting player could then possibly receive the ball from yet another teammate and score points via a layup or dunk.
Slot cut
The slot cut web page is published. The slot cut comprises action that occurs when an offensive player cuts to the basket via a slot area on the court. The diagram below demonstrates one of the basic examples of the slot cut.

Slot
The slot web page is published and it currently features general information primarily in relation to offensive strategies that emphasize the slot area. The diagram below demonstrates one of the strategies that uses the slot area during the initial formation.

The flex offense is a basketball strategy that creates scoring opportunities near the basket or near the perimeter areas, typically by way of the flex screen and the down screen.
Wing basketball plays
Wing basketball plays is currently published. At this time, it features a handful of plays that involve wing players such as the shooting guard or small forward. The diagram below demonstrates one of the wing plays.
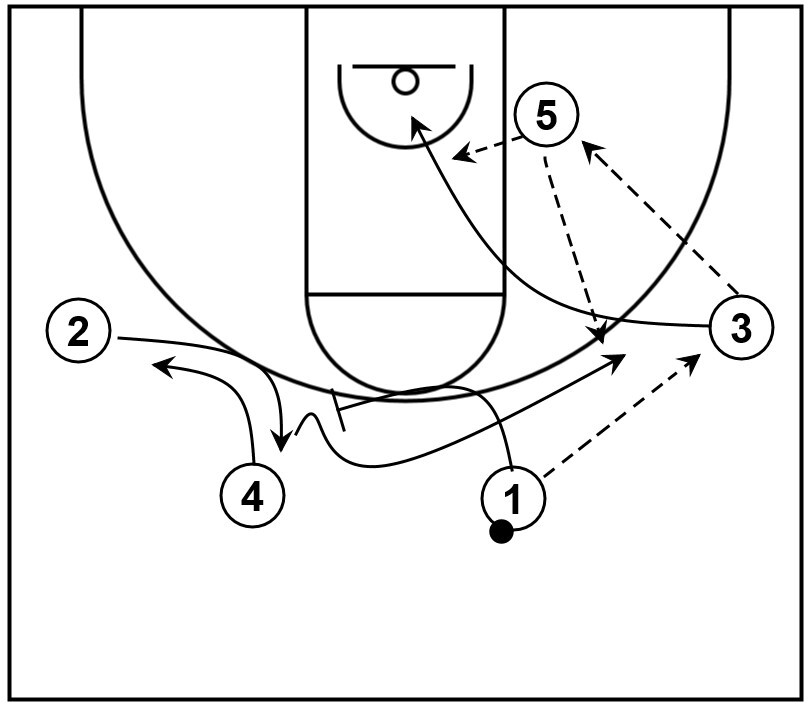
In terms of the diagram above, 2 and 3 are the wing players who are able to perform different actions, which can result in scoring opportunities.
Wing
The wing web page is published. It currently features basic information about the wing area as well as general information about traditional wing players. There are also a handful of basketball diagrams such as the one below.
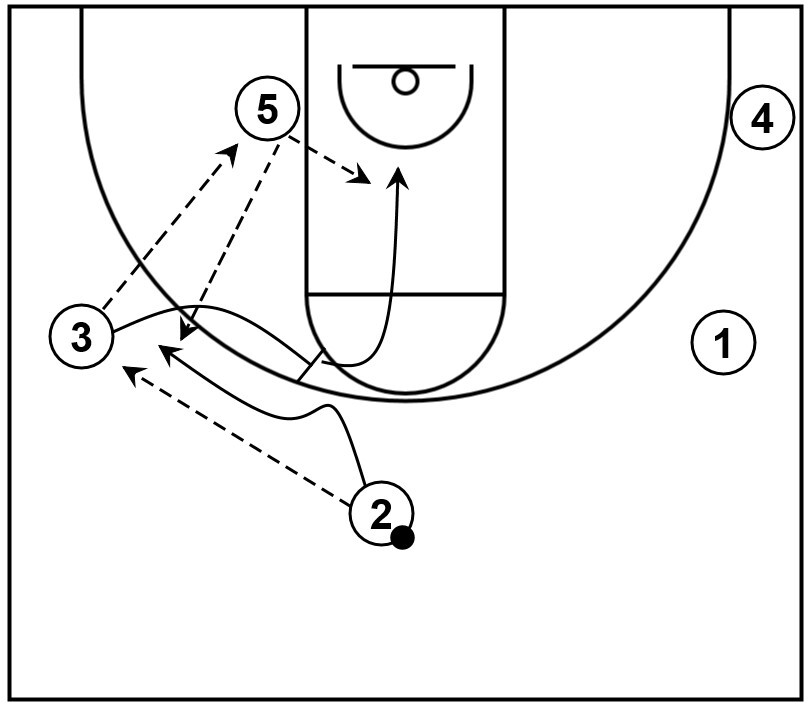
A wing player executes a split cut, which could lead to scoring opportunities near the basket or beyond the three-point line.
2-3 zone offense
The first version of the 2-3 zone offense web page is available. It currently features a few plays such as the one below that can be utilized to attack the 2-3 zone defense.
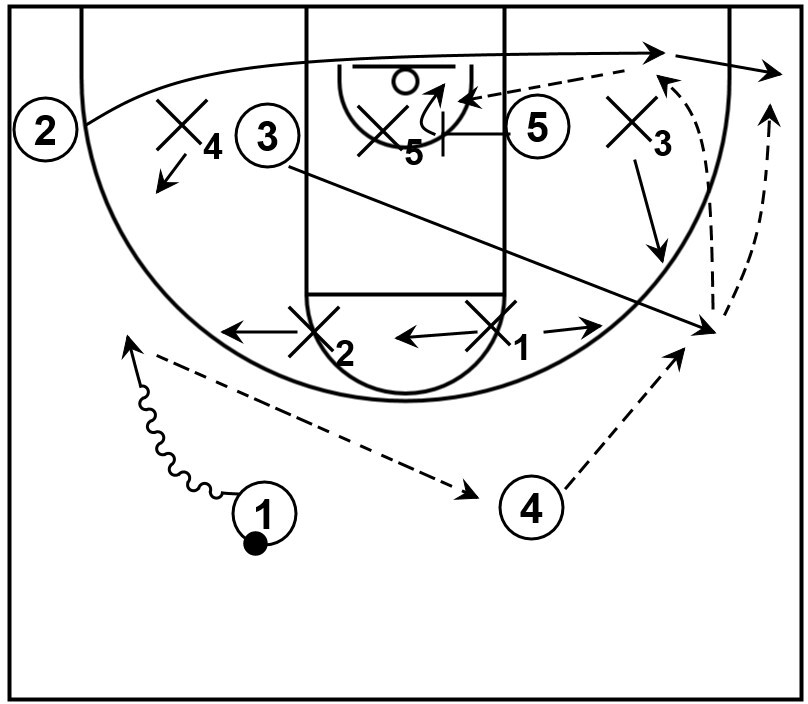
An offensive player runs the baseline against the 2-3 zone, which could lead to one or more scoring opportunities.
Small forward
The small forward web page has received an update, which now includes diagrams of offensive actions that could be utilized by the small forward such as the image below.
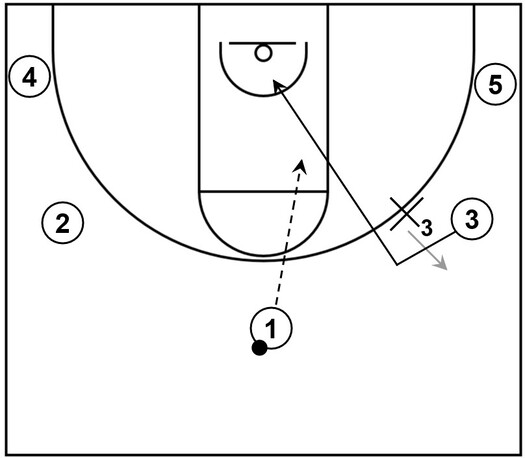
On the adjacent diagram, the small forward performs a backdoor cut to get open near the basket, which could lead to a possible scoring opportunity.
Give and go
The give and go web page has received an update, which includes new diagrams of various offensive actions such as the one below.
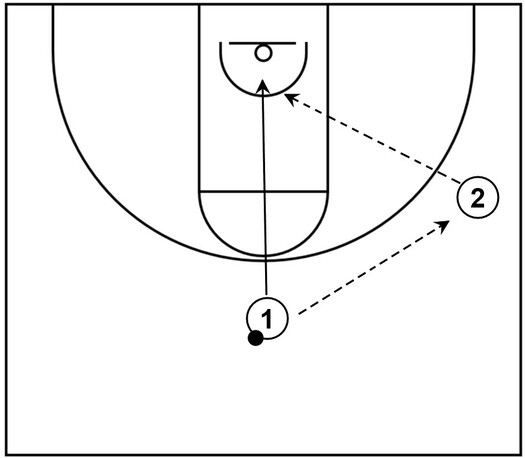
In reference to the image above, an offensive player passes the basketball to their teammate, immediately cuts to the basket, and receives the ball again for a scoring opportunity near the rim, which completes the give and go sequence.
Roll and replace
The roll and replace web page has received an update, which currently includes basic examples such as the diagram below.
Roll and replace is a basketball tactic that occurs when one offensive player rolls towards the basket from a perimeter area of the court, particularly after setting an on-ball screen, while another offensive player replaces towards the perimeter from an area near the basket.
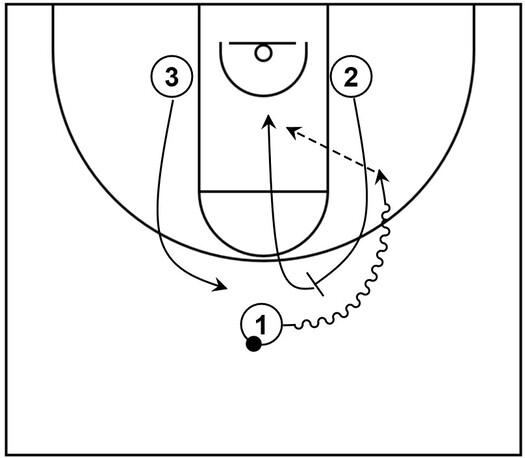
The diagram above demonstrates a player rolling to the basket after setting a pick while another player replaces around the perimeter area of the court, particularly near the top.
Reverse layup
The reverse layup web page has received a minor update. There are new images such as the one below that attempt to be a visual representation of an offensive player performing a reverse layup.
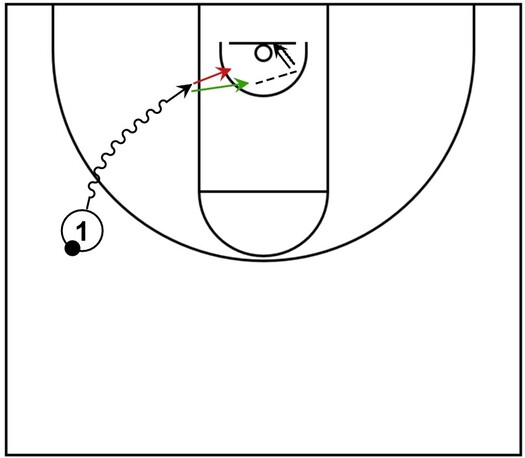
In reference to the diagram above, 1 dribbles toward the basket and executes a reverse layup on the opposite side of the backboard relative to their original location.
Shooting guard
The shooting guard web page has received a brief update. Essentially, there are new diagrams that demonstrate different actions that a shooting guard can utilize to score points such as the one below.
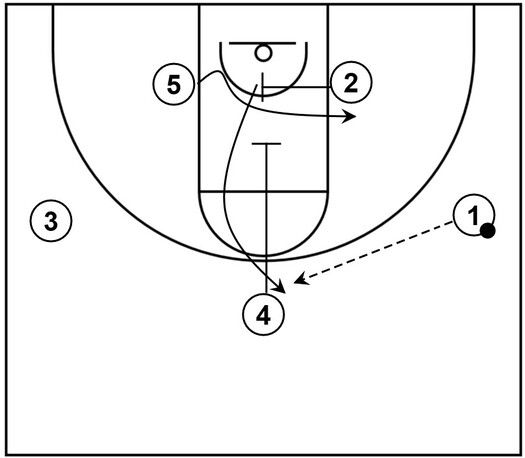
In reference to the image above, the shooting guard sets a cross screen and then uses a down screen, which could result in a three-point shot opportunity.
Off-ball screen
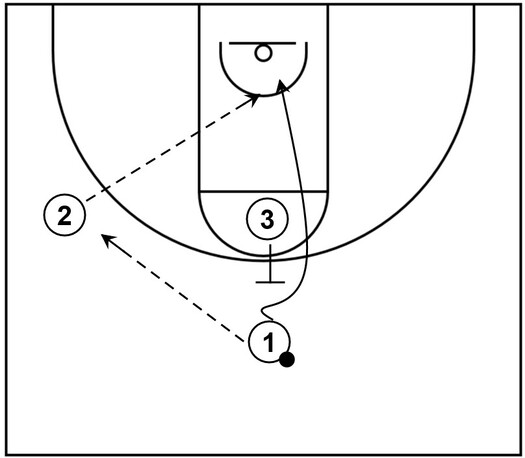
The off-ball screen web page is currently updated with new material, particularly new diagrams within the ‘Types’ section.
An off-ball screen consists of action that occurs when at least one offensive player sets a screen for another offensive player who does not have current possession of the basketball, ultimately to create a potential scoring opportunity near the basket or near perimeter areas of the court.
Pressure defense
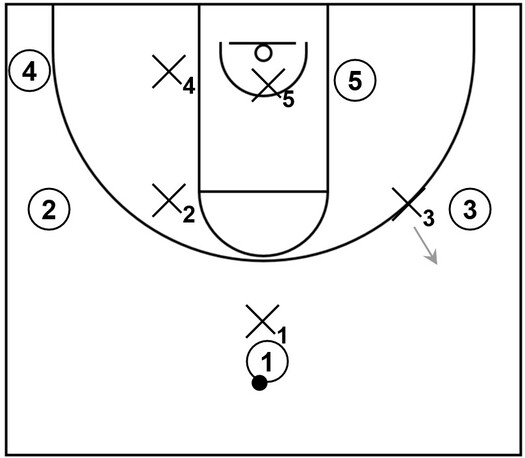
The pressure defense web page has received an update with new material, particularly in reference to man to man defense.
Pressure defense, in general, comprises basketball concepts that could be executed by one or more defenders in a full court or half court setting to disrupt offensive productivity which could lead to detrimental offensive results such as low quality shot attempts and/or turnovers.
Furthermore, pressure defense could potentially be effective because it could constrain at least one offensive player into executing undesirable actions that are not beneficial to them or the offensive team as a whole.
Split cut
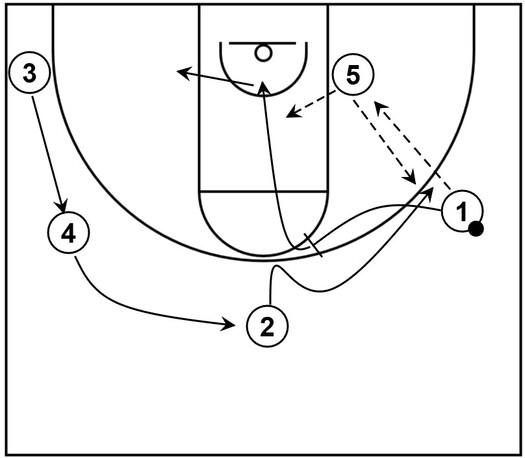
A split cut occurs when a perimeter player passes the basketball to a post player and afterwards, that same perimeter player cuts away from the post player to set or use a screen that includes another nearby perimeter player.
The updated web page shows examples of basic split cuts as well as potential benefits and drawbacks of utilizing or not implementing the split cut.
Furthermore, there are also different examples of basketball plays that include the split cut within the overall offensive scheme such as the diagram below.
3-point basketball plays
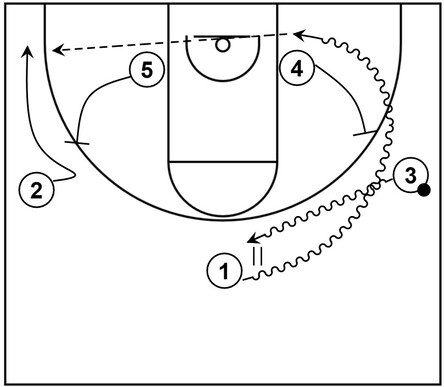
The first version of 3-point basketball plays web page is published. It currently features plays from a 1-4 set as well as a 1-4 low set. However, more plays will be added over time to showcase various types of scoring options.
The diagram below shows an example of one of the 3-point plays.
Power forward
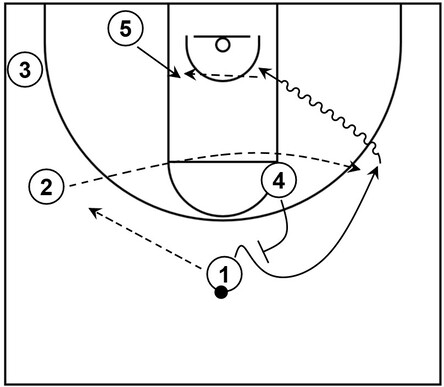
The power forward web page is now updated with a variety of different images. More specifically, there are several diagrams that demonstrate different types of actions that the power forward could carry out on the basketball court, particularly as it relates to setting screens for other teammates.
The diagram below demonstrates one of the typical screening actions that could be executed by the power forward.
Full court press
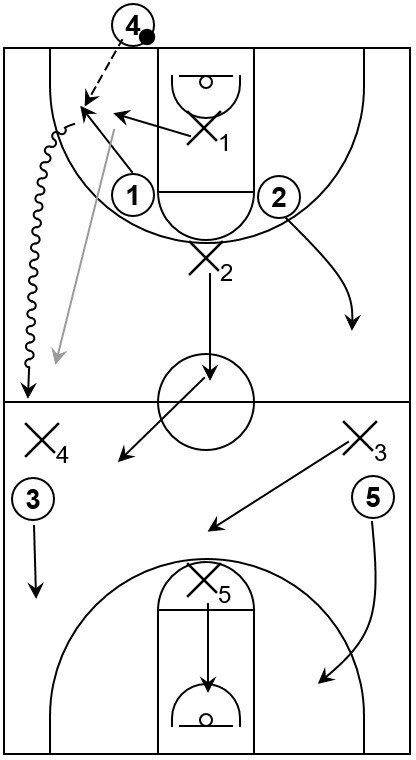
The full court press web page has received an update. The page contains basic information about the full court press as well as additional concepts such as the general advantages and disadvantages of implementing a full court press.
Additionally, there are a few example diagrams of full court press defenses such as the image below and more are planned for a later time.
Flare screen
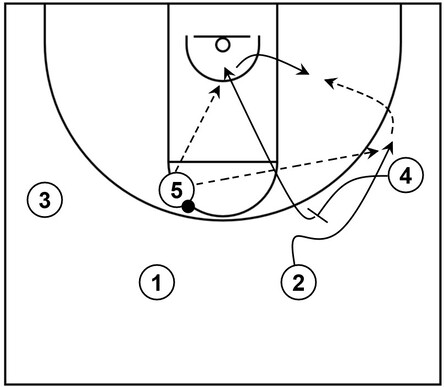
The flare screen web page has received an update. The page consists of the general definition of the flare screen, basic flare screen examples, as well as general information on its effectiveness and a possible drawback to consider.
The diagrams are also revamped and there is a new spread play featuring the flare screen as showcased below.
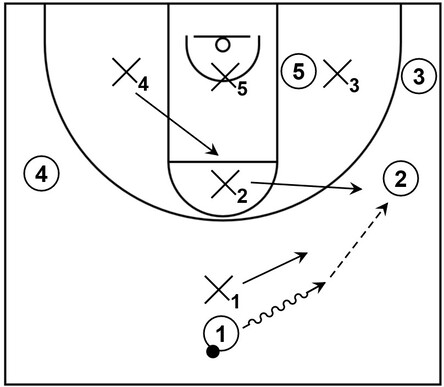
1-1-3 zone defense
The 1-1-3 zone defense web page is updated. Essentially, there is new basic information about the 1-1-3 zone defense in addition to new diagrams of defensive rotations that feature pressure concepts and match-up principles.
At this time, the diagrams showcase examples of several possible defensive actions that can occur when the ball is at the top, on the wing, or in the corner.
There are also details on what can happen when the ball gets skipped from one side of the floor to the other or how defensive players could potentially react when an offensive player drives to the basket from the corner.
The diagram below gives a brief demonstration of defensive actions within the 1-1-3 zone.
High post
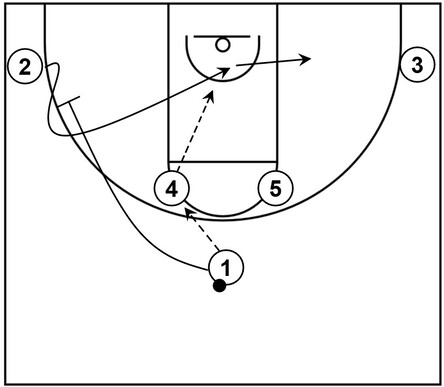
The high post web page has received an update. There is new general information about the high post area alongside other related spots on the court as well as fresh basketball plays such as the diagram below.
1-1-3 press defense
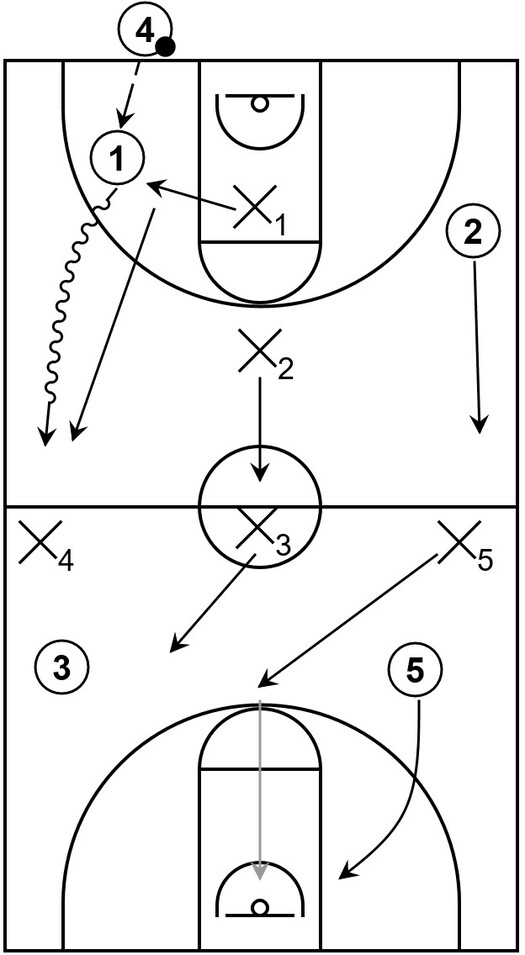
The 1-1-3 press defense web page has received a minor update. Most of the text was revised to provide more clarity on the basic concepts and there is a new section that briefly covers the general meaning behind the 1-1-3 numbering format. The image below showcases one of the updated diagrams.
Basketball cuts
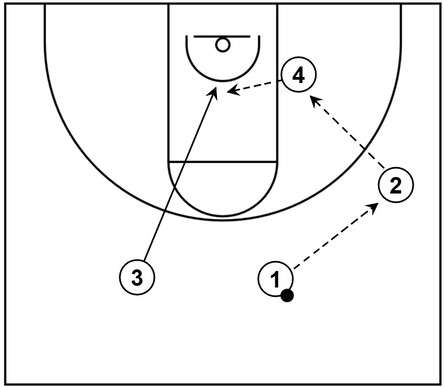
The basketball cuts web page has received an update. There are several new diagrams alongside a handful of plays and drills. The image below shows one of the new diagrams, which is an example of the slot cut.
1-4 high offense
The 1-4 high offense web page has received an update. This includes new diagrams as well as new sections featuring different types of basketball plays such as the image below.

Horns offense
The Horns offense web page has received an update. There are new diagrams and the older plays have been redrawn to reflect the changes such as shown on the image below.
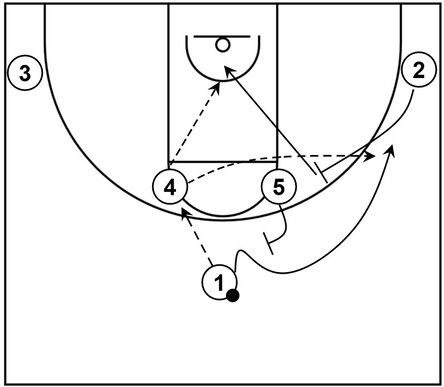
Iverson Cut
The Iverson cut web page has received an update. There are currently new diagrams and plays such as the example below.
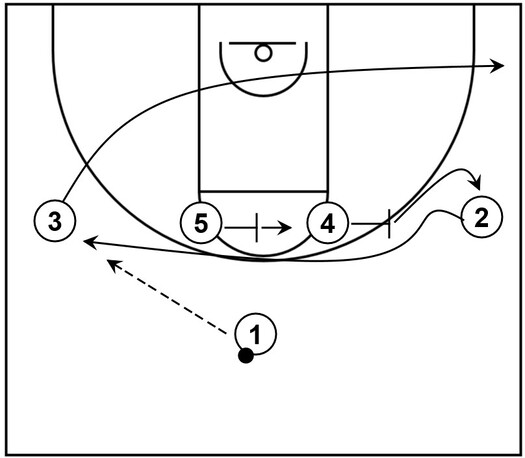
Pick and Pop: Concepts and Examples
The first version of the pick and pop web page is published. It currently contains basic information about pick and pop action including various simple examples such as the diagram below.
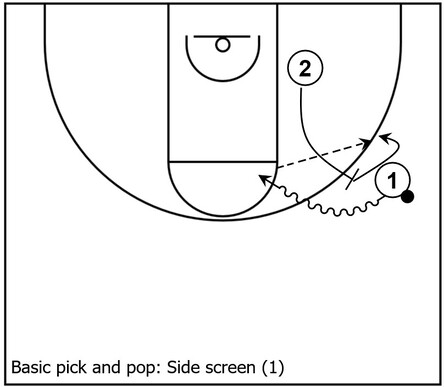
Perimeter: Basic Concepts and Examples
The perimeter web page has received a fresh update, which mainly includes general information about the perimeter areas, perimeter players, perimeter shots, as well as perimeter defense.
There are also various new diagrams that demonstrate basic examples of concepts associated with the perimeter in basketball.
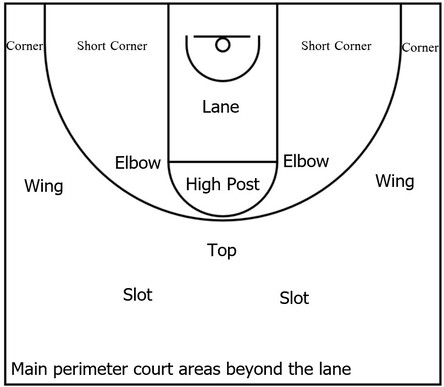
Below is an example diagram that shows the typical perimeter areas on the basketball court.
