Basic information about the flare screen in basketball
General definition of flare screen
The flare screen consists of action that occurs when one offensive player, being guarded by a defender, cuts away from the basketball to use a screen that is set by a second offensive player and afterwards, the first offensive player could then receive the ball, particularly near the perimeter areas of the court.
Following that, that same offensive player could attempt to score, especially by way of an open jump shot or possibly execute another type of playmaking action, which could lead to additional scoring opportunities.
Examples of basic flare screens
These are basic examples of flare screens that are utilized by offensive players near the top and wing areas of the basketball court.
It should also be noted that the offensive players on the following diagrams within this section are simply denoted via numbers such as 1, 2, or 3, and do not have specified roles at this time.
Additionally, that general rule applies to defensive players as well such as X1, X2, and so on.
Basic flare screen 1
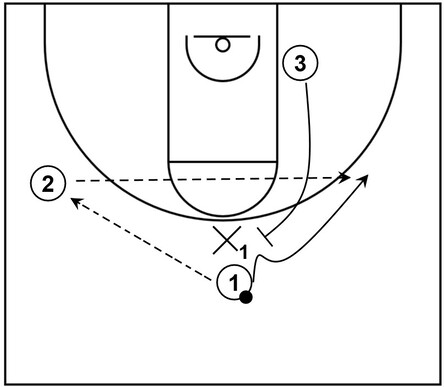
This section contains an example diagram of basic flare screen action near the top comprising a few offensive players and one defensive player on the court.
In terms of the setup, 1 begins at the top, 2 starts near the left side wing, and 3 begins near the right side low post area, which is also indicative of good spacing concepts.
It should also be noted that the defender, X1, is guarding 1 with standard man to man defense.
To start the action, 2 receives the ball from 1, represented by the dotted arrow. Following that, 1 cuts toward the right side wing area via a flare screen set by 3.
Afterwards, 1 receives the ball from 2 and could take the open jump shot.
Basic flare screen 2
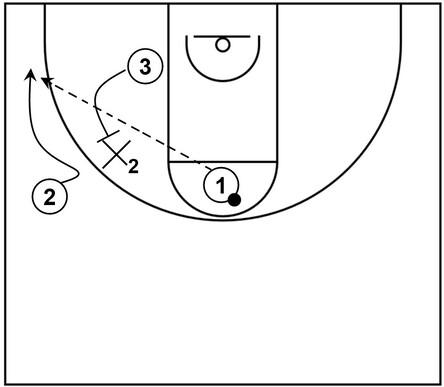
This section contains an example diagram of basic flare screen action near the wing featuring a few offensive players and one defensive player on the court.
For the initial setup, 1 begins at the high post area near the free throw line, 2 begins near the left side wing, and 3 starts near the left side low post area. Moreover, X2 is covering 2 with standard man to man defense.
To start the action, 2 cuts to the left side corner via the flare screen set by 3. After that happens, 2 receives the ball from 1 and could take the open jump shot.
Potential effectiveness of flare screens
The flare screen is potentially effective because it can be generally difficult for the off-ball defender to see the screen, fight over the top of the screen, or evade the screen altogether by going under it while providing adequate help defense if necessary.
Furthermore, the offensive player that uses the flare screen would cut away from the ball as opposed to cutting towards it, which an offensive player would perform with basketball screens such as the cross screen or the down screen.
This, in turn, could result in an sufficient amount of separation between the offensive player that uses the flare screen and the defensive player that is being targeted by the screen.
Moreover, if the offensive player that uses the flare screen does get open and that same player is an exceptional slasher or elite three-point shooter, then that could also be a detriment to the defender guarding that same offensive player.
The following basketball diagram below seeks to illustrate this point.
Flare screen creates separation from the targeted defender
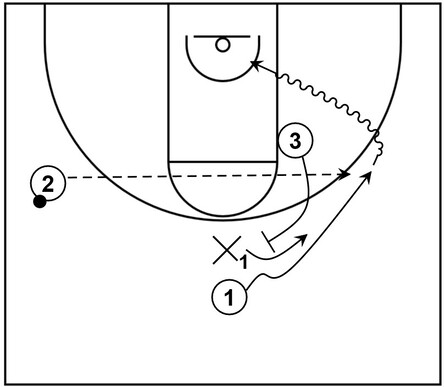
On the adjacent diagram, the targeted defender, indicated as X1, attempts to fight over the top of the flare screen as the offensive player, denoted as 1, cuts away from the ball and eventually receives it via a skip pass by 2.
However, as X1 fights over the screen, that could give 1 more time to take an open jump shot or dribble to attack the rim, which is represented by a wavy arrow in this instance.
Possible drawback of flare screens
A possible drawback of the flare screen is its potential susceptibility to the switch defense tactic, which could be utilized to mitigate its overall effectiveness.
The following basketball diagram attempts to illustrate this point.
Defenders switch assignments to limit the flare screen
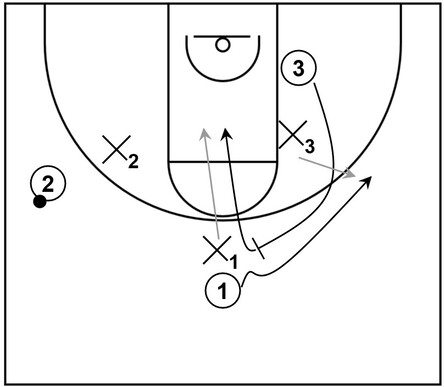
On the diagram, 1 cuts to the right side wing area in an attempt to get open for a possible jump shot or drive to the basket.
However, X3 switches to 1, represented by the gray arrow, which also makes it more difficult for 1 to get open and receive the ball from 2.
Furthermore, X1 switches to 3, who set the screen. Additionally, 3 cuts to the basket after setting the screen but X1 is there to take away an easy scoring opportunity. The movement of X1 is also shown via a gray arrow.
Essentially, in this simple scenario, the switch tactic renders the flare screen ineffective for the offensive team.
Examples of flare screen basketball plays
These are examples of different basketball plays that involve flare screens to create scoring opportunities for offensive players.
Furthermore, each of the offensive players on the diagrams below are generally represented by the standard basketball positions, unless otherwise noted.
In essence, 1 is the point guard; 2 is the shooting guard; 3 is the small forward; 4 is the power forward; 5 is the center.
Continuity: 5 Out
This is an example of the flare screen within continuity offense, which features scoring opportunities near the basket or near perimeter areas of the court.
It is based on 5-Out Motion Offense, Volume 2 by Harry Perretta. Also, players should consider a few general rules in reference to the offensive action.
The player that uses the flare screen should initially set up the defender before cutting away.
The player that sets the flare screen should turn towards the ball and slip the screen to the basket immediately following the screening action.
The player that receives the ball should take one or two dribbles towards the player using the flare screen to get a better passing angle.
Furthermore, the player that receives the ball after the flare screen has the option to shoot a jump shot, particularly from three-point range, or pass the ball to the player who slipped to the basket.
It should be mentioned as well that for these diagrams, the offensive players do not necessarily have to follow the traditional basketball positions.
In other words, the players can be positionless in this particular instance but it is not an absolute requirement.
Part 1
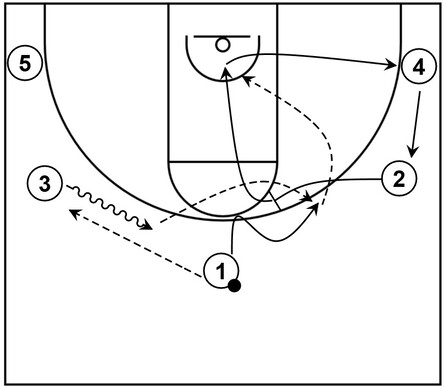
In terms of the basic setup: 1 is at the top; 2 and 3 occupy the wings; 4 and 5 fill the corners.
From there, to start the action, 3 receives the ball from 1 and afterwards, 3 dribbles toward the left slot area between the top and left side wing. As that happens, 1 cuts away to the right slot area between the top and right side wing via a flare screen set by 2.
Following that, 1 receives the ball from 3 and at the same time, 2 slips to the basket while 4 lifts up towards the right side wing area.
From there, 1 could take the open three-point shot or 2 could receive the ball and score near the basket.
If 2 does not receive the ball from 1, then 2 could continue the cut towards the right side corner.
Part 2
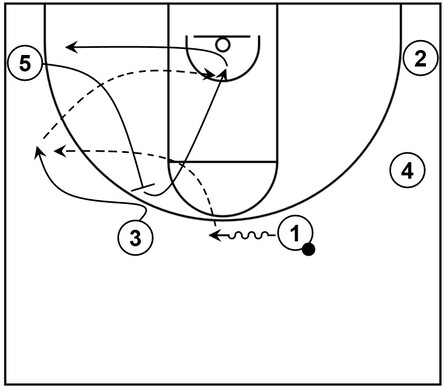
Next, 1 dribbles toward the top and when that happens, 3 cuts toward the left side wing via a flare screen set by 5.
Afterwards, 3 receives the ball from 1 and at the same time, 5 slips to the basket.
Following that, 3 could take the open three-point jump shot or 5 could receive the ball instead and score near the rim.
Alternatively, if 3 receives the ball but does not shoot or pass, then 5 could self replace at the left side corner.
Part 3
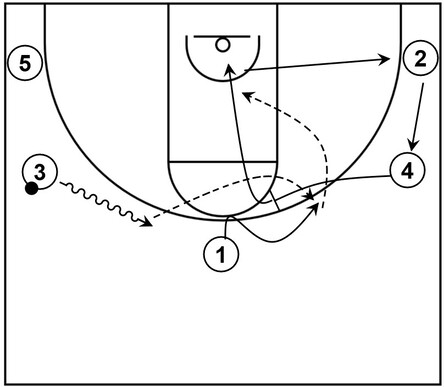
At this point, the offensive team can continue to execute the flare screen action but with a different player setting the screen on the weak side of the ball.
In essence, 3 dribbles toward the left slot and when that happens, 1 cuts toward the right slot via the flare screen set by 4.
After that, 1 receives the ball from 3 and at the same time, 4 slips to the basket while 2 fills the right side wing area.
Next, 1 could take the three-point shot if that is open or 4 could receive the ball and score around the basket.
Alternatively, if 4 does not receive the ball from 1, then 4 could cut towards the right side corner.
Part 4
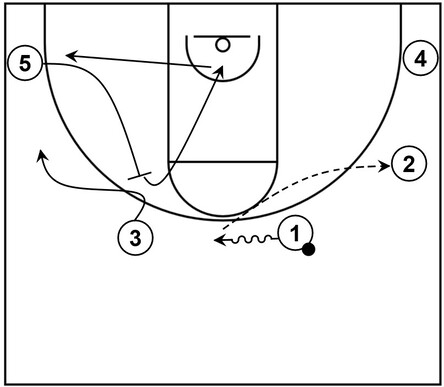
For this part of the play, let’s say that 1 dribbles toward the top but 3 is not open after the flare screen and 5 is not open after the slip screen.
When that happens, the offensive team can simply run the continuity on the other side of the court.
Therefore, 2 receives the ball from 1 as 3 settles in near the left side wing and 5 self replaces in the left side corner.
Part 5
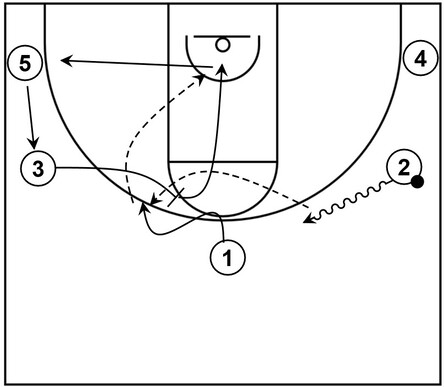
Next, 2 dribbles toward the right slot and as that happens, 1 could cut away to the left slot via the flare screen set by 3.
From there, 1 could receive the ball from 2 and at the same time, 3 could slip to the basket while 5 fills the left side wing area.
Afterwards, 1 could take the three-point shot if that is available. Otherwise, 3 could receive the ball from 1 and score near the basket.
Alternatively, if 3 does not receive the ball, then 3 cuts toward the left side corner.
Part 6
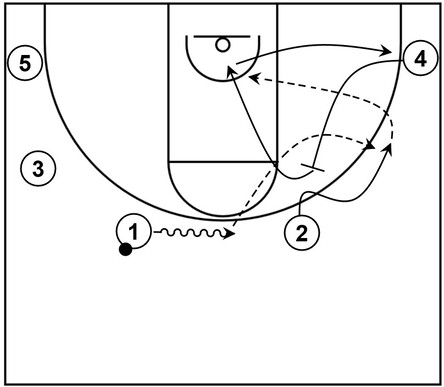
Continuing the action, 1 dribbles toward the top and as that happens, 2 cuts away toward the right side wing via the flare screen set by 4.
Following that, 2 could take the open three-point shot or 4 could receive the ball and score around the basket.
Alternatively, if 2 receives the ball but does not shoot or pass, then 4 could execute a self replace towards the right side corner.
From that point, the continuity could technically keep going until the offensive team takes a field goal attempt, preferably a high percentage shot near the basket or a wide open three-pointer.
Spread
This section features a play with flare screen action that comprises four perimeter players spread across the slots and wings plus an additional player in the high post.
As a result, this particular setup is sometimes called a Spread offense, mainly due to the aforementioned players being extended across the different perimeter-oriented areas of the court, which also creates good spacing and opens up the low post areas as added bonuses.
Additionally, this formation can be considered a 2-guard front or 2-3 alignment.
It is a 2-guard front because there are two guards at the front of the formation.
Similarly, it can be looked at as a 2-3 alignment because there are two players at the top of the alignment (the two guards in the slots) as well as three players at the bottom of the alignment who occupy the wings and high post area.
Part 1
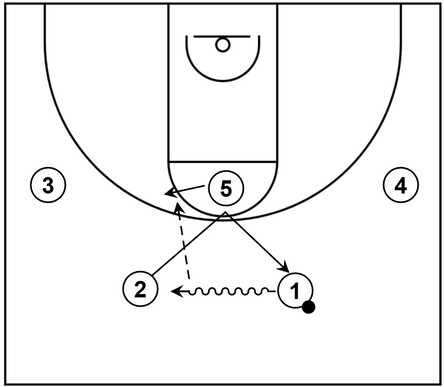
This spread play is based on insights from The Complete Guide to the High Post Offense vs. Any Defense by Dana Altman.
In reference to the initial setup: 1 and 2 are within the slots, 3 and 4 occupy the wings, and 5 fills the high post area.
To start, 1 dribbles toward 2, which also leads to a mini V-cut towards the high post and then towards the right slot area by 2.
Also, as that happens, 5 slides over toward the left side high post elbow and then receives the ball from 1.
Part 2
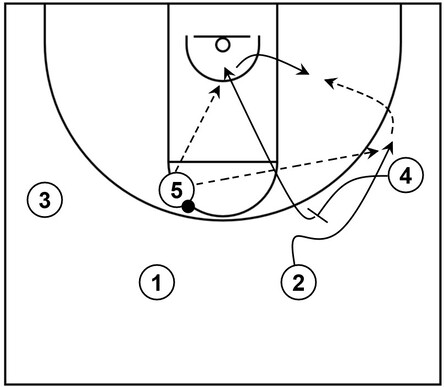
Next, 2 cuts toward the right side wing via a flare screen set by 4. Also, 4 slips to the basket following the screening action.
5 can pass with 2 as the recipient, which could lead to a possible open jump shot. Conversely, 4 could receive the ball instead and score around the basket.
In addition, if 2 receives the ball but is not open for a jump shot, then 4 could occupy the right side low post area.
After that, 4 could receive the ball from 2 and attempt to score via a low post move.
Special Situation: Late Game Clock
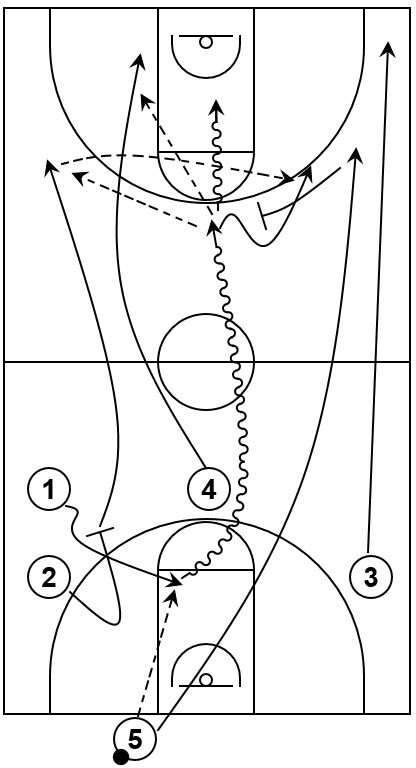
This is an example of a special situation that uses a flare screen. More specifically, it is a late game clock play that could be potentially useful against a full court man to man defense with approximately eight to ten seconds remaining and the team needs two or three points to win or tie the game.
To start, 1 cuts to an area slightly below the free throw line but above the restricted arc within the lane by way of a screen set by 2.
Afterwards, 1 receives the ball via the inbound pass that is thrown by 5.
Next, 1 quickly turns and begins to dribble down the middle of the court while the other players sprint down the court as well.
2 should sprint to the left side wing area, 3 should sprint to the right side corner, 4 should sprint towards the left side low post area and 5 should sprint to the right side wing area.
From there, if the team needs two points, then 4 could possibly receive the ball from 1 and score by way of a layup at the rim or by way of a swift low post move around the basket.
1 could also simply take a mid-range jump shot, shoot a floater in the lane, or drive all the way to the basket and score via a layup.
On the other hand, if the team needs three points, then 2 could receive the ball from 1. After that, 1 could cut to the right side wing area via a flare screen set by 5, receive the ball from 2, and take the jump shot.
It should also be mentioned that if 1 is not open to receive the ball or there is simply not enough time, then 2 will have to make a quick basketball move such as a step back and then shoot a desperation three-pointer.
A desperation three-pointer is not necessarily the best action for the team as a whole but it is still better than letting the game clock expire without getting off a field goal attempt at all.