Basic information about the high post in basketball
General definition of high post area
The high post is a specific area on the basketball court which begins from one edge of the free throw line to the other edge in addition to the area that is between the free throw line and the top of the three-point line.
Furthermore, the edges of the free throw line are typically known as the high post elbows or simply, the elbow areas of the court.
General description of high post offense
A high post offense is a strategy that emphasizes the use of a high post player who can gain possession of the basketball and/or use other offensive actions such as handoffs or screens to create scoring opportunities near the basket or around perimeter areas of the court.
Additionally, while executing a high post offense, players on the court will typically occupy other perimeter-oriented spaces as well.
These particular areas are generally known as the top, wings, slots, and corners.
The adjacent diagram below showcases the common court areas that could be occupied by players when executing a high post offense alongside a brief description of those areas.
Common court areas for high post offense
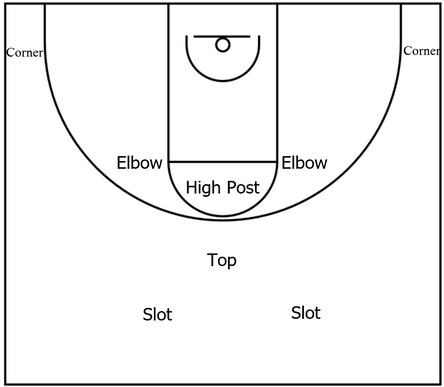
The top, sometimes referred to as top of the key or point, is the general area located behind the three-point line in the middle of the offensive team’s frontcourt.
The slots, sometimes called the lane line extended areas, are the general areas that are adjacent to the top area as well as the areas between the top and the wings.
The wings consists of the court areas behind the three-point line that are adjacent to the nearest sideline, which is commonly at or above the free throw line extended.
The corners comprise the areas behind the three-point line that are in the general vicinity of a sideline and its adjoining baseline.
Examples of high post offense basketball plays
These are examples of different basketball plays that use the high post area to create one or more scoring opportunities for offensive players.
Furthermore, each of the offensive players on the diagrams below are generally represented by the standard basketball positions.
In essence, 1 is the point guard; 2 is the shooting guard; 3 is the small forward; 4 is the power forward; 5 is the center.
It should be noted as well though that each of the non-center positions (i.e players 1 through 4) can be potentially utilized interchangeably in many instances.
Moreover, in some cases, player 5 might possibly swap to a non-center role to create a totally positionless offense. Nevertheless, if an offensive sequence is positionless, it will most likely be mentioned prior to the start of a play’s description.
1-4 high
This section includes a high post play that is initiated from a 1-4 high offensive set.
Part 1: Handoff
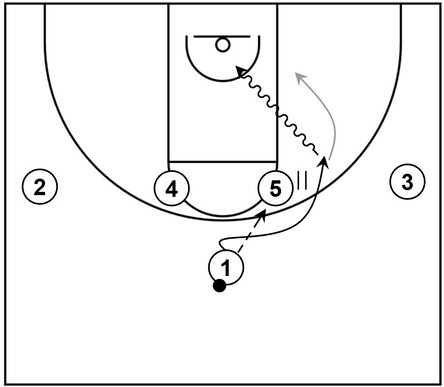
This high post play features a handoff among other actions from the 1-4 set. Also, for the setup: 1 is at the top; 2 and 3 are on the wings; 4 and 5 fill the high post elbows.
To begin, 5 receives the ball from 1, indicated by the dotted arrow, while located at the right side high post elbow area.
Next, 1 follows that pass and looks to receive the ball again from 5 via the handoff, represented by the double pipe symbol.
If 1 gains possession of the ball again, then 1 can attack the rim by dribbling towards the basket, represented by the wavy arrow, looking to score via a high percentage layup.
Otherwise, if 1 does not receive the ball via the handoff, then 1 can continue the cut towards the right side low post area, represented by the gray arrow.
Part 2: DHO and double screen
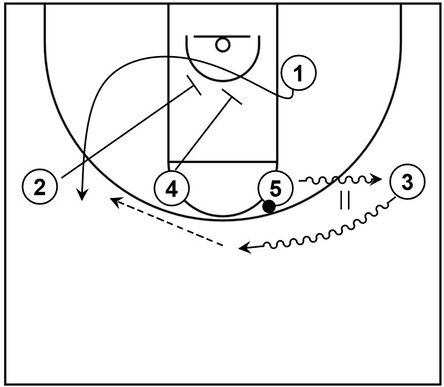
Continuing the play, 5 performs a dribble handoff, also known as a DHO, with 3 near the right side wing area.
Also, as that DHO action is happening, 1 cuts up toward the left side wing area via the double screen set by 2 and 4.
Afterwards, 1 could receive the ball from 3 and take the three-point shot, assuming that is open.
Horns
This section includes a high post play that is initiated from a Horns offensive set.
Part 1: Wide pin down and curl cut
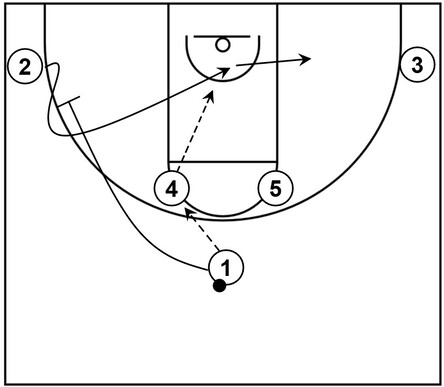
This high post play includes a wide pin down screen and curl cut among other actions from a Horns set.
In terms of the initial setup: 1 is at the top; 2 and 3 fill the corners; 4 and 5 occupy the high post elbow areas.
To start, 4 receives the ball from 1 at the left side high post elbow area.
From there, 2 executes a curl cut to the basket by way of a wide pin down screen set by 1.
After that, 2 could receive the ball from 4, which could lead to a high percentage field goal near the basket.
Otherwise, if 2 does not receive the ball, then 2 can continue through to the right side low post area.
Part 2: DHO and flex
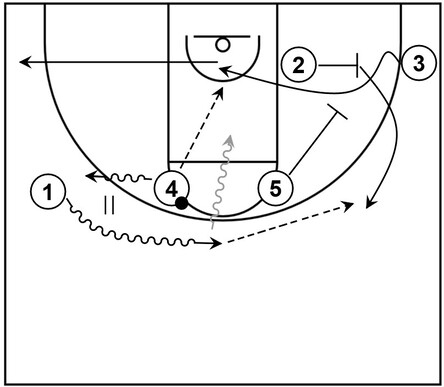
Next, 3 can cut to the basket via the flex screen set by 2 and receive the ball from 4, which could lead to another scoring opportunity around the basket.
However, if 3 is not open, then 3 continues through to the left side corner.
Following that, 4 performs a dribble handoff with 1 and while that occurs, 2 cuts toward the right side wing area via the down screen set by 5.
From there, 2 could receive the ball from 1 and take the three-point shot if that is open.
However, if 2 is not open after the screen the screener action, then 1 has the option to dribble drive from the top and make a play if necessary, indicated by the gray wavy arrow.
Point
This section features high post plays that are initiated from the Point series of Princeton offense, which consists of a high post entry pass followed by additional actions, ultimately to create scoring opportunities around the rim or near perimeter areas of the basketball court.
Point Away, Part 1: Cut through and flash
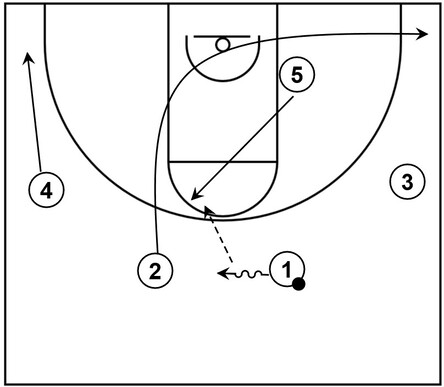
This high post play features basic player movement primarily consisting of a flash cut and through cut during the initial phase of the Point away sub-series.
For the basic setup: 1 and 2 occupy the right and left slots respectively; 3 and 4 fill the right and left wings respectively; 5 initially takes up space at the right side low post area.
To begin the play, 1 dribbles toward the top, which is also a signal that 2 should cut through to the right side corner.
Additionally, as that happens, 5 flashes across towards the left side elbow area and receives the ball from 1 while 4 flattens to the left side corner.
Point Away, Part 2: Screen away and rejection
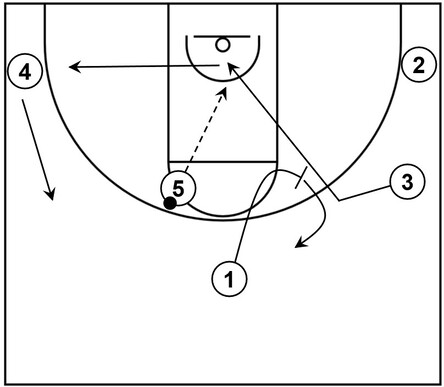
Next, 1 cuts away from the ball to set a screen in the general vicinity of the right side high post area.
From there, 3 initially cuts toward the screen as if to utilize it but ultimately rejects it and executes a backdoor cut to the basket.
Afterwards, 3 can receive the ball from 5, which could result in a high percentage layup.
Otherwise, 3 can continue the cut out towards the left side corner while 4 lifts to fill the empty left side wing.
Also, 1 can pop back to the right side slot following the screening action.
Point Away, Part 3: Backdoor cut
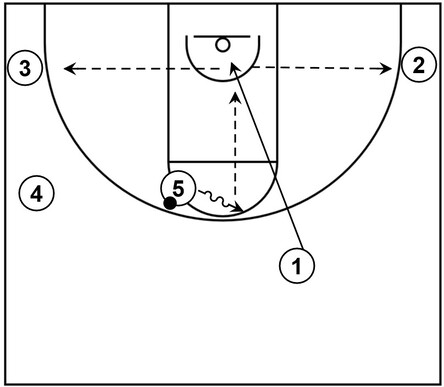
After the previous actions, 5 can dribble towards 1, which is a signal for a backdoor cut.
From there, 1 could receive the ball from 5 and score at the rim via a layup.
Alternatively, 2 or 3 could receive possession of the ball via a kick pass from 1.
Following that, 2 or 3 could take the three-point jump shots, assuming those are available.
Point Under, Part 1: Slot to slot pass, cut through, and elbow lift
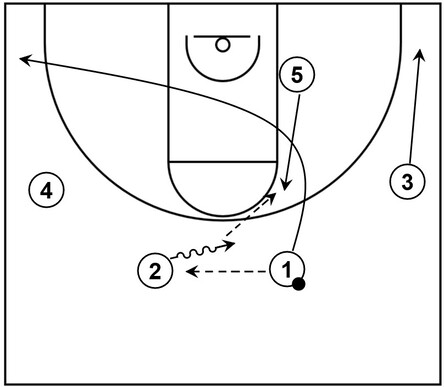
This high post play, based on the Point under sub-series, features a slot to slot pass, cut through action, as well as a lift cut towards the elbow.
For the setup: 1 and 2 are in the slots; 3 and 4 are on the wings; 5 is initially near the right side low post area.
To start the play, 1 makes the slot to slot pass with 2 as the receiver and immediately cuts through to the left side corner.
After that, 2 dribbles toward the top while 5 lifts up toward the right side high post area to receive the ball from 2.
Additionally, as all of that action happens, 3 flattens out to the right side corner.
Point Under, Part 2: Basic handoff + Pin down screen and slip
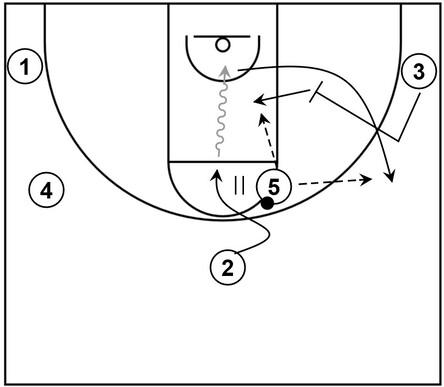
Next, 2 cuts towards the high post and receives the ball from 5 via a handoff.
From there, 2 can dribble and attack the rim, shown via the gray wavy arrow, which could result in a layup.
Otherwise, if 2 does not receive the ball, then as 2 is cutting towards the basket, 3 can briefly moves towards 5 but immediately cut back near the low post area to set a pin down screen.
2 could use that screen, cut towards the right side wing area, and receive the ball from 5, which could result in a three-point shot.
Alternatively, 3 can slip towards the lane after setting the screen, receive the ball from 5 instead, and score near the basket.
The slip option may be beneficial if the defender who would be covering 3 decides to switch to take away the potential jump shot from 2.
Point Over, Part 1: Slot to wing pass, cut through, and elbow lift
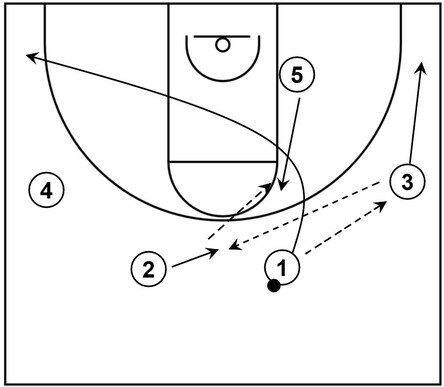
This high post play, derived from the Point over sub-series, consists of a slot to wing pass, cut through action, and an elbow lift cut.
In reference to the setup: 1 and 2 are in the slots; 3 and 4 are on the wings; 5 is initially near the right side low post area.
To begin the play, 3 receives the ball from 1 who cuts through to the left side corner.
As that happens, 2 cuts toward the top from the left slot and 5 lifts up towards the right side high post elbow area.
From there, 2 receives the ball from 3 and 5 receives it from 2.
Moreover, after executing the wing to top pass, 3 flattens out to the adjacent right side corner.
Point Over, Part 2: Screen rejection and pop back
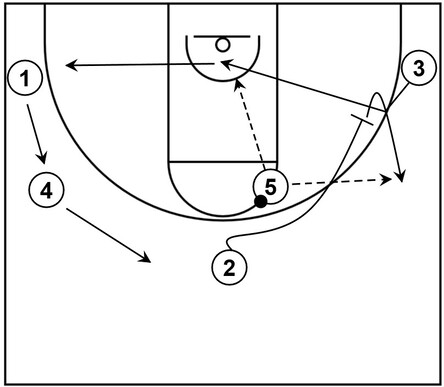
Next, 2 cuts over 5 to set a wide pin down screen for 3.
However, 3 rejects that screen and executes a backdoor cut towards the rim.
Following that, 3 could receive the ball from 5 and score at the basket.
Alternatively, if 3 is not open, then 2 could pop back towards the right side wing and gain possession of the ball from 5.
At the same time, 3 can cut to the left side corner while 4 moves to the left slot area and 1 fills and replaces at the left side wing.
Point Over, Part 3: Two-man pick and roll
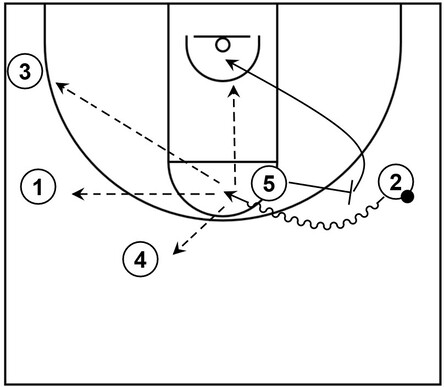
Continuing the play, 2 dribbles toward the high post area via the on-ball screen or pick that is set by 5.
Following that, 5 rolls to the basket and could receive the ball from 2, which could lead to a layup or dunk at the rim.
Alternatively, 1, 3, or 4 could also be possible scoring options if one of those players were to receive the ball from 2.
Spread
This section includes a high post play that comprises four perimeter players spread across the slots and wings plus an additional player in the high post.
As a result, this particular setup is sometimes referred to as a Spread offense, mainly due to the aforementioned players being extended across the different perimeter-oriented areas of the court, which also creates good spacing and opens up the low post areas as added bonuses.
Additionally, this formation can be considered a 2-guard front or 2-3 alignment.
It is a 2-guard front because there are two guards at the front of the formation.
Similarly, it can be looked at as a 2-3 alignment because there are two players at the top of the alignment (the two guards in the slots) as well as three players at the bottom of the alignment who occupy the wings and high post area.
Part 1: Back screen
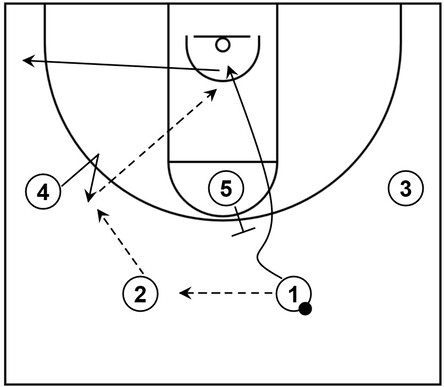
This is an example of a high post play with scoring opportunities near the basket or near perimeter areas of the court.
It is based on insights from The Complete Guide to the High Post Offense vs. Any Defense by Dana Altman.
In terms of the initial setup: 1 and 2 occupy the right and left slot areas respectively; 3 and 4 fill the right and left side wings respectively; 5 occupies the high post area near the middle of the free throw line, also known as the nail area.
To begin, 2 receives the ball from 1 via a slot to slot pass and as that happens, 4 performs a small V-cut to get open near the left side wing.
Following that, 4 receives the ball from 2 and then 1 cuts to the basket on the outside of the ball via a back screen set by 5.
Afterwards, 1 can receive the ball from 4, assuming that is open, which could then lead to a high percentage layup at the rim. Otherwise, 1 can cut through to the left side corner.
Part 2: Curl or slip option
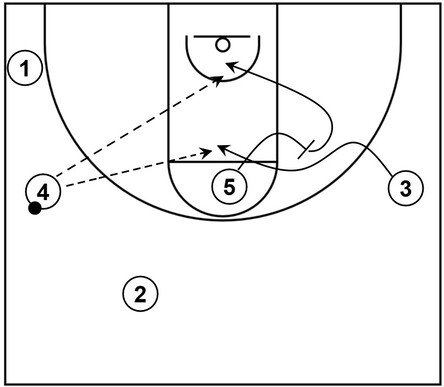
Next, 3 can perform a small curl cut just below the free throw line via a screen set by 5 near the right side elbow.
From there, 3 could receive the ball from 4, which could then lead to a mid-range shot.
Alternatively, if the defender guarding 5 (not shown) was to help off the ball near 3 or that same defender completely switched to 3, then 5 can slip to the basket, receive the ball from 4, and score via a layup or dunk.
5 can also move towards the basket simply for offensive rebounding purposes as well.