General definition of split cut
A split cut occurs when a perimeter player passes the basketball to a post player and afterwards, that same perimeter player cuts away from the post player to set or use a screen that includes another nearby perimeter player.
It should be mentioned as well that the split cut is also known as a post split or split action because the player who passed the basketball to the post would usually split away from the other perimeter player following the screening action.
Moreover, both perimeter players that are involved in the screening action would typically split between the post in addition to each other.
Examples of basic split cuts
This section features basic diagram examples of split cuts that are utilized by an offensive player initially located near the wing area of the basketball court.
It should also be noted that the offensive players on the following diagrams within this section are simply denoted via numbers such as 1, 2, or 3, and do not have specified roles at this time.
Example 1: Split cut, screen away, and slip action
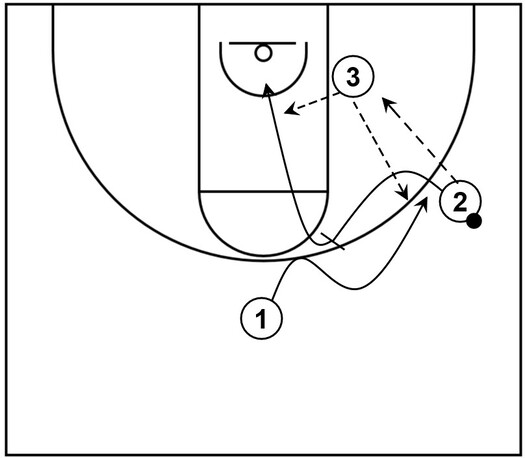
This is an example diagram of the split cut, which could then lead to possible scoring opportunities near the basket or on the perimeter.
In terms of the setup: 1 begins at the top; 2 starts near the right side wing with possession of the basketball, represented by the black dot; 3 begins near the right side low post area.
To start the simple action, 3 receives the ball from 2, represented by the dotted arrow. Following that, 2 executes the split cut to set a basketball screen away from the ball for the adjacent perimeter player, who is 1 near the top.
From there, 1 uses that screen and cuts to the wing area that is now vacated by 2.
Afterwards, 1 could receive the ball from 3, which could result in a three-point shot opportunity.
Additionally, as an alternative option, 2 can slip the screen towards the basket and receive the ball from 3 instead of 2 being the recipient.
Example 2: Split cut, screen away, and screen rejection
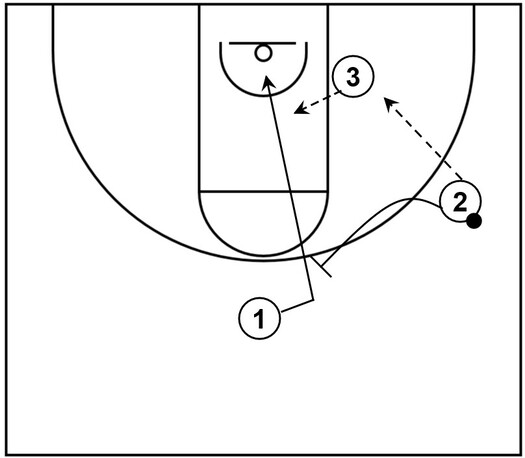
This is another example diagram of the split cut. The setup is also the same as the previous diagram as well.
To begin, 3 receives the ball from 2. Afterwards, 2 executes the split cut, mainly to set a screen away from the ball with 1 as the recipient.
From there, 1 initially moves toward 2 but ultimately rejects the screen with a backdoor cut to the basket instead.
Following that, 1 could receive the ball from 3 and score via a layup.
Example 3: Screen from top and split cut
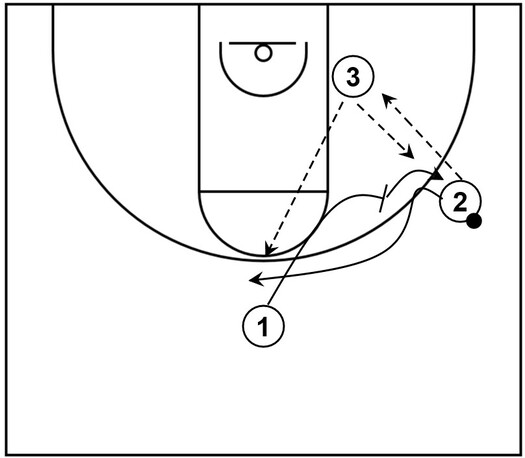
This is an example of a split cut in which the player feeding the post uses a screen instead of setting one. The setup is also the same as the previous diagrams too.
To start, 3 receives the ball from 2 via the post entry pass. Next, 1 cuts toward the right side wing to set a screen. At the same time, 2 executes the split cut and moves towards the top via the screen set by 1.
From that, 2 could receive the ball from 3 and take the open three-point shot. Alternatively, 1 could fill the vacant right side wing after setting the screen, receive the ball from 3, and take the three-point shot as well.
Potential drawback when split cut is not implemented
Off-ball defender adjacent to the ball can provide help and still possibly closeout
When an offensive player executes the post entry pass or feeds the post but then remains stationary in the same spot, it can be much easier for the off-ball defender who is guarding the player who fed the post (and is adjacent to the post) to provide help defense on the strong side.
Putting it another way, when the player feeding the post stands still and does not execute the split cut or even another type of basketball cut, particularly through and/or away from the ball such as with the Laker cut, then the result could be a disruption in offensive execution.
Moreover, even if the post player kicks the ball back out to the initial post feeding player, the off-ball defender who provided help can still potentially have time to closeout to their original assignment.
The diagrams below attempt to showcase examples of this concept.
Additionally, each of the offensive players on the diagrams below as well as within subsequent sections later are generally represented by the standard basketball positions and that would apply to defensive players as well, unless otherwise noted.
Essentially, 1 and X1 are the offensive and defensive point guards, respectively.
2 and X2 are the offensive and defensive shooting guards, respectively.
3 and X3 are the offensive and defensive small forwards, respectively.
4 and X4 are the offensive and defensive power forwards, respectively.
5 and X5 represent the offensive and defensive center positions, respectively.
Affiliate Disclosure: I may earn a commission on qualifying purchases made through the links below.
Example: Off-ball defender leaves assignment to offer help defense
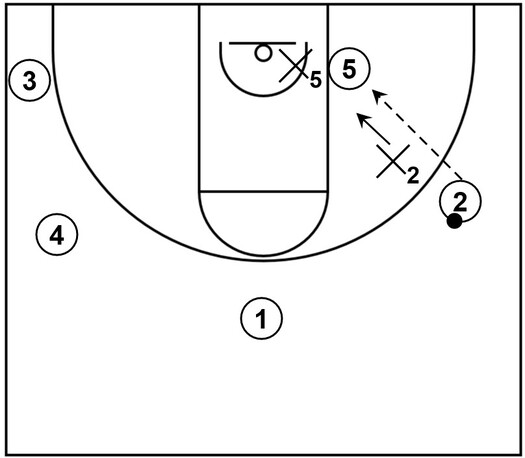
For this example, 5 receives the basketball from 2 and after that, X2 immediately leaves their assignment or check to provide help to their defensive teammate, indicated as X5.
Basically, once this happens, X2 can dig in at the ball to try to steal it or possibly execute a double team alongside X5.
In either case, it would probably be very challenging for 5 to perform low post actions and/or score the ball with efficiency when there is a secondary defender in the nearby vicinity.
Example: Off-ball defender can still possibly closeout after providing help
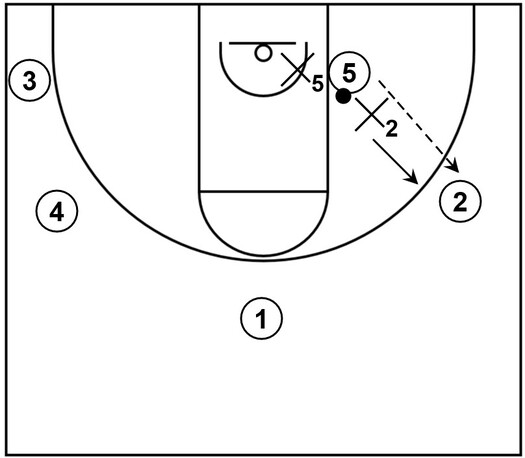
In reference to this adjacent diagram, 2 receives the ball again from 5 due to the strong side help defense. However, X2 can still possibly closeout, displayed via the solid black arrow, to stay in front of 2 in the case of dribble penetration or to contest a potential jump shot.
This is also considering the fact that X2 is technically only one pass away between 2 and 5 as well.
Essentially, X2 could still have time to close because of the distance between where 2 and 5 are located, hence why it is generally beneficial for the offensive team as a whole when 2 does not remain stationary following the post entry pass.
This can be even more of a factor if X2 possesses an adequate amount of speed and/or quickness to recover in time and/or if 2 is a total non-shooter or possesses a less than ideal field goal percentage from mid-range or beyond the three-point line.
Potential benefits when split cut is utilized
Off-ball defender adjacent to the ball moves away from it
When an offensive player feeds the post and then follows up with the split cut, that same player’s defender would generally have to move away from the ball to stick with their check or assignment. Otherwise the player who split away from the ball after the post entry would most likely be wide open as their defender would be too far from them.
The diagrams below demonstrate examples of these basic concepts.
Example: Off-ball defender moves alongside assignment following post entry pass
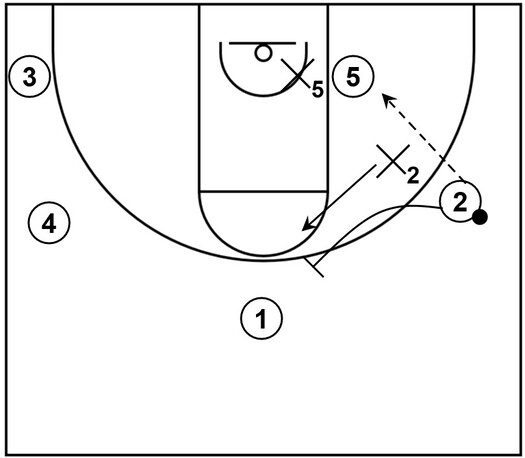
For this example, 5 receives the ball via the post entry pass by 2. Afterwards, 2 moves away via the split cut to set a screen for 1 and X2 moves alongside as well, represented by the solid black arrow.
Example: Off-ball defender attempts to provide help during split action
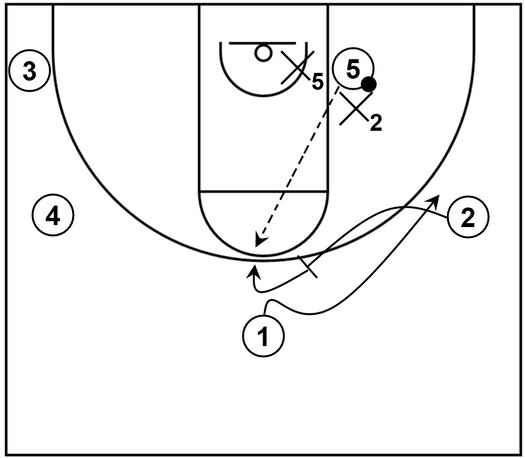
Here is an example of what could happen if an off-ball defender attempted to provide help on the ball while the split action was happening. In other words, the off-ball defender did not move alongside their assignment after the post entry pass.
Essentially, while X2 is trying to dig at the ball or double team alongside X5, 2 has set the screen and popped to the top area. If that occurred, X2 is simply too far away to closeout and recover in time, which could lead to an open jump shot if 5 were to pass the ball as shown on the diagram.
It should be noted though that defenders with at least a decent basketball IQ would probably not do something as detrimental as this. Nonetheless, it is still shown here for demonstrative purposes.
More space for the post player to operate
When the offensive player feeds the post and follows up with the split cut, this typically gives the post player more space to operate, particularly via 1 on 1 isolation action.
This also assumes that the nearest off-ball defender who was guarding the post feeder does not attempt to help after the split action, which is probably not likely anyway.
The diagram below showcases a basic example of this concept.
Example: Post player has more space to operate
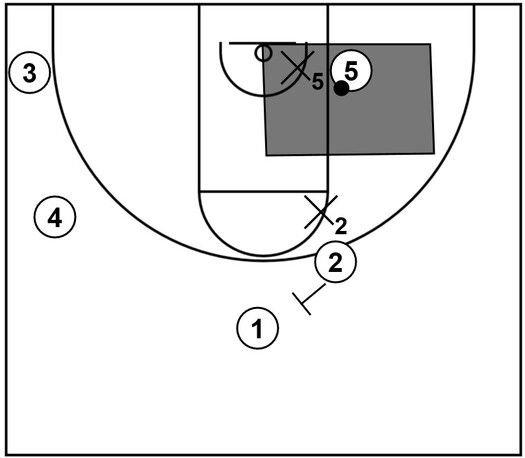
In reference to the adjacent diagram, as 2 sets the screen following the split cut, 5 has a decent amount of space to operate against X5, represented by the gray shaded area.
It should also be noted that this assumes as well that the corner on the strong side will be empty as displayed on the diagram.
Multiple scoring opportunities
In general, by performing the split cut, that could lead to multiple scoring opportunities, either for the post player or for the players involved in the screening action.
The diagrams below demonstrate this concept.
Example: Scoring opportunity via low post action
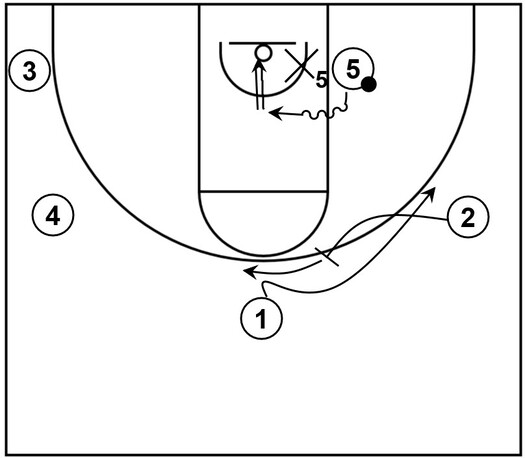
As mentioned earlier, when the split cut occurs, this can isolate the post, which can lead to a scoring opportunity around the rim.
On the diagram, as the split action happens near the perimeter, 5 dribbles into the lane area, indicated by the wavy arrow, and takes a close-range shot, represented by the wide arrow.
Example: Scoring opportunity near perimeter
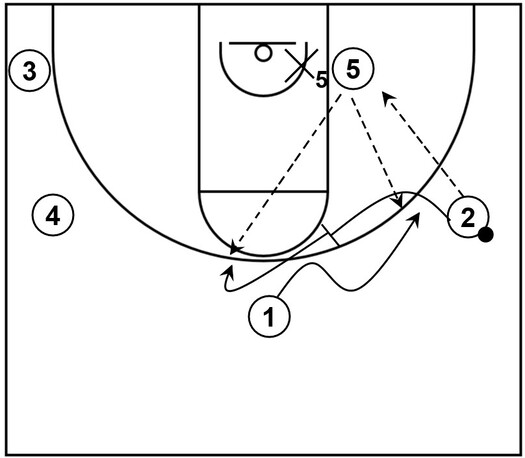
This diagram is similar to what was shown in the basic examples section. Basically, after 5 receives possession of the ball via the post entry pass, split action happens between 1 and 2.
From there, either 1 or 2 could receive the ball, which could result in three-point shot opportunities.
Example: Scoring opportunity vs. switch defense
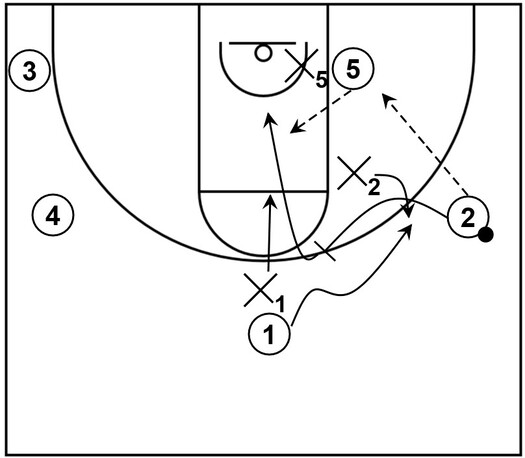
It should be noted as well that if the opposing team attempts to hinder the screening action with switch defense, then the screener can slip to the basket, which can lead to a scoring opportunity.
On the diagram, X2 switches to 1 following the screen set by 2. However, because X1 is basically above 2 during the screening action, that means 2 can quickly slip to the basket while X1 chases behind.
From there, 2 could receive the ball from 5 and score via a layup at the rim.
This is even more of a problem for the defense if both 1 and 2 are above average three-point shooters.
To give more clarity, let’s say that X2 switches to 1 in an attempt to take away the three-point shot and at the same time, X1 drops back during the screening action so that 2 will not be below them.
When that occurs, 2 can pop back instead of slipping and then X2 would have to closeout to not give a wide open shot.
Examples of basketball plays that feature split cut
This section contains examples of different basketball plays that feature split cut action within the overall offensive scheme.
Moreover, each of the offensive players on the diagrams below are generally represented by the standard basketball positions.
In essence, 1 is the point guard; 2 is the shooting guard; 3 is the small forward; 4 is the power forward; 5 is the center.
4 Out
This is an example of a play initiated from a 4 out 1 in formation that comprises the split cut as well as additional actions for scoring opportunities at the rim or beyond the three-point line.
Part 1: Dribble entry, through cut, and shallow cuts
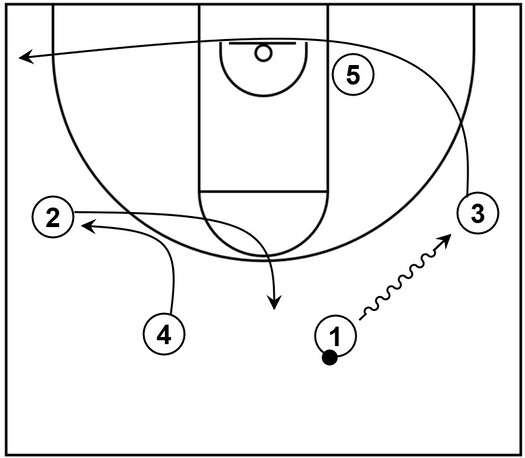
To start this play, 1 performs a dribble entry towards the right side wing while 3 cuts through the baseline to the left side corner.
Additionally, as that happens, 2 and 4 execute shallow cuts towards the top and left side wing areas, respectively.
Part 2: Split cut
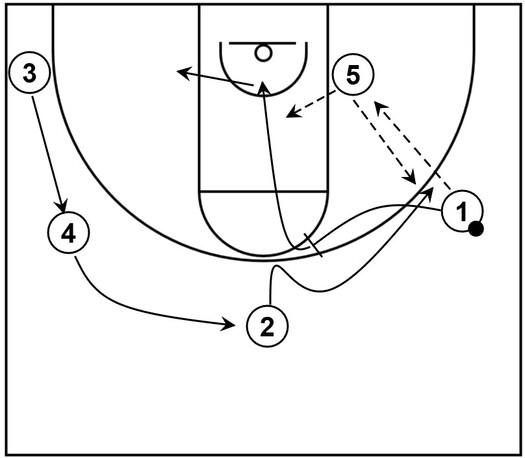
Continuing on, 5 receives the ball from 1. Afterwards, 1 performs a split cut and screens away, which is utilized by 2.
Next, 2 fills the vacant right side wing area while 1 slips to the basket following the screening action.
From there, 2 could receive the ball from 5, which could lead to a three-point shot or 1 could receive it instead, which could result in a layup at the rim.
Otherwise, 1 cuts to the left side low post area for the time being.
What’s more, 4 could fill the top while 3 fills the vacant left side wing area.
Furthermore, 5 could also just keep possession of the ball and attempt to score via a low post move and subsequent shot as well.
Part 3: Screen the screener
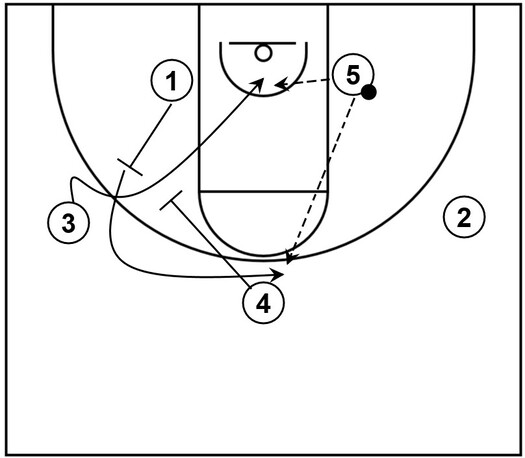
If 5 did not try to score, then 3 could perform a shuffle type of cut towards the rim via the back screen set by 1.
What’s more, as that happens, 1 could cut to the top via a down screen set by 4, which also completes the screen the screener action.
Following that, 3 could receive the ball from 5 and score around the rim. Alternatively, 1 could receive it instead and take the three-point shot if that is open.
Box
This is an example of a box offense set play that comprises the split cut as well as additional actions for scoring opportunities at the rim or beyond the three-point line.
Part 1: Dribble entry and down screens
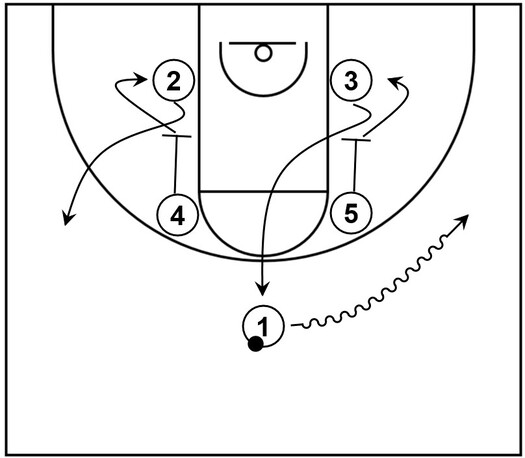
To begin the play, 1 executes a dribble entry towards the right side wing.
As that occurs, 2 cuts to the left side wing while 3 performs the zipper cut towards the top, both by way of down screens set by 4 and 5.
Moreover, 4 and 5 both respectively fill the unoccupied left side and right low post areas.
Part 2: Split action and weak side cut
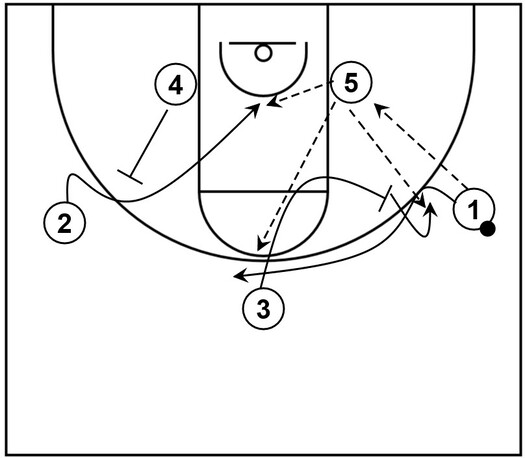
Next, 1 makes the post entry pass with 5 as the recipient. Following that, 1 cuts to the top via the screen set by 3 who also fills the vacant right side wing area.
This completes the split action between 1 and 3 as well. Afterwards, 1 or 3 could receive the ball from 5, which could lead to possible three-point shots.
Alternatively, on the weak side of the court, 2 could cut to the basket via the back screen set by 4.
From that point, 2 could receive the ball from 5 and score via a layup at the rim.
Spread
Part 1: Dribble entry and back screen
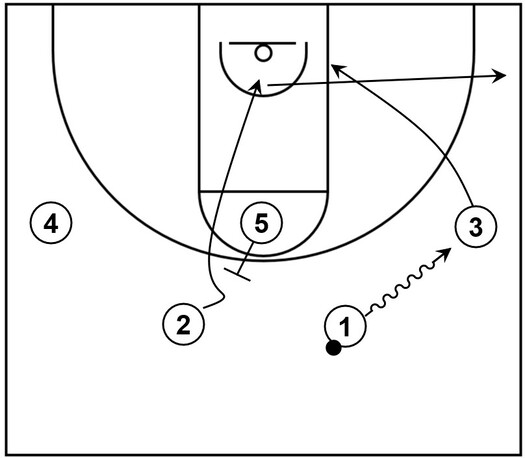
This is an example of a basketball play initiated from a Spread offense, which includes a 2-guard front and three additional players near the wings and high post area respectively.
It is also derived from insights within The Complete Guide to the High Post Offense vs. Any Defense by Dana Altman.
To start, 1 performs a dribble entry towards the right side wing while 3 cuts to the right side low post block.
Also, as that happens, 2 initially cuts to the basket via a back screen set by 5 and then eventually continues the cut through to the right side corner.
It should be noted that although it’s not shown on the diagram, if 2 happens to get open during the initial cut and back screen action, then 1 could pass the ball with 2 as the recipient.
From there, 2 could score via a layup at the rim. Otherwise, as stated earlier, 2 simply continues through to the corner.
Part 2: Screen rejection and double screen
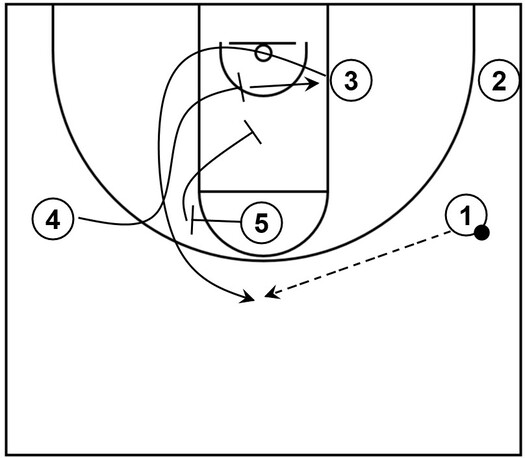
Next, 4 initially cuts toward 5 as if to use a screen near the left side high post elbow area. However, 4 rejects that screen and cuts away to set a screen in the lane.
Additionally, as that happens, 5 also sets a screen in the lane, which now comprises a double screen alongside the screen set by 4.
Furthermore, 3 cuts to the top by way of those screens set by 4 and 5, receives the ball from 1, and could take the three-point shot if open.
This also gives 4 and 5 an opportunity to box out for a possible offensive rebound.
Alternatively, if 3 gains possession of the ball but does not take the three-point shot, then 4 could fill the vacant right side low post area.
Part 3: High low option
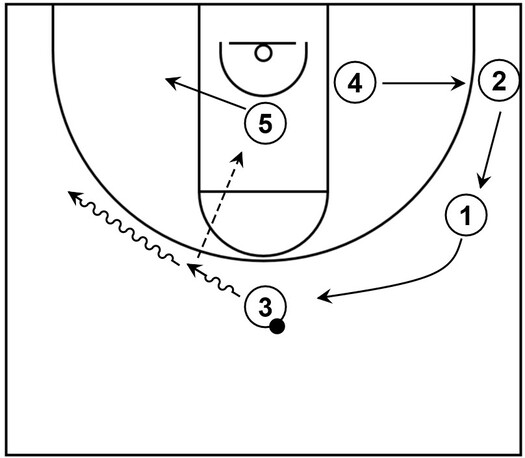
Continuing on, 3 could take one or two dribbles towards the left slot area between the wing and the top area.
From there, 5 could receive the ball from 3 via the high low option and attempt to quickly score near the basket.
If that is not open though, then 3 could continue dribbling towards the left side wing while 5 moves across the lane to the left side low post area.
Also, as that occurs, 1 could fill the top, 2 could fill the right side wing area, and 4 could fill the right side corner.
Part 4: Split cut
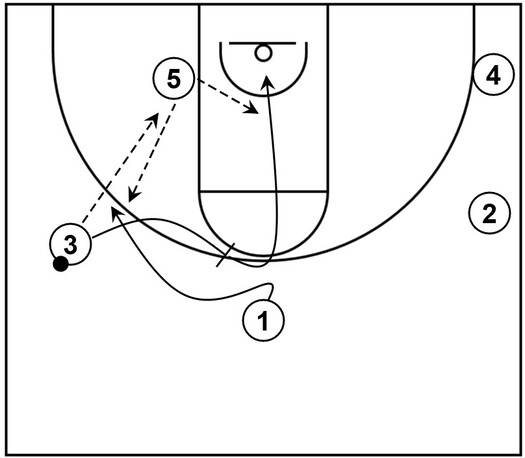
Next, 5 could receive the ball from 3 who would then execute the split cut and screen away. 1 could use that screen and cut to the left side wing while 3 slips to the basket.
From there, 3 could receive the ball again from 5, which could lead to a scoring opportunity near the rim. Alternatively, 1 could receive it instead, which could lead to a potential three-point shot.
Related: LeBron James on Defending the Golden State Post Splits in the NBA Finals – YouTube