General definition of Horns offense
The Horns offense is a basketball offensive strategy that emphasizes good spacing to create scoring opportunities by way of various actions such as basketball screens and dribble handoffs.
Example of Horns offense initial alignment
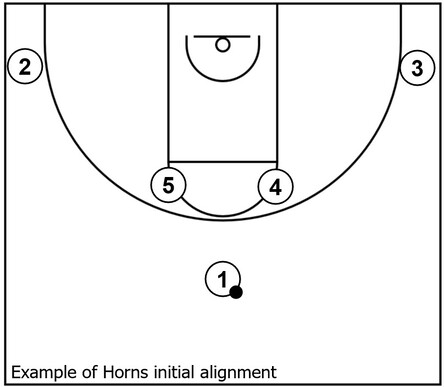
This is an example of the initial alignment for Horns offense.
In essence, one offensive player starts at the top in the middle of the court. Two additional offensive players begin at the high post elbow areas while the other two offensive players setup in the corners.
What’s more, the diagram above as well as subsequent diagrams throughout the web page showcase the players indicated as numbers represented by the standard basketball positions.
That is to say, 1 is the point guard while 2 and 3 are the shooting guard and small forward respectively. Moreover, 4 and 5 are the power forward and center respectively.
Generally speaking, the most common formation of the Horns offense will typically have the point guard as the play initiator at the top, the shooting guard fills one corner, the small forward occupies the other corner, the power forward fills one high post elbow area, and the center occupies the other elbow area.
However, it is possible for players to switch locations during the initial alignment. For example, the small forward and the point guard could switch places, which would have the point guard in one of the corners while the small forward initiates the offense at the top.
Nevertheless, the overall premise remains the same: one player at the top, two players at the elbows, and two players in the corners.
Horns offense basketball plays
These are examples of different types of basketball plays for the Horns offense. These particular sets seek to create high percentage scoring opportunities near the basket or around perimeter areas of the court.
Pick and roll plays
This section contains examples of pick and roll plays initiated from the Horns set.
Pick and roll play 1: Basic ball screen
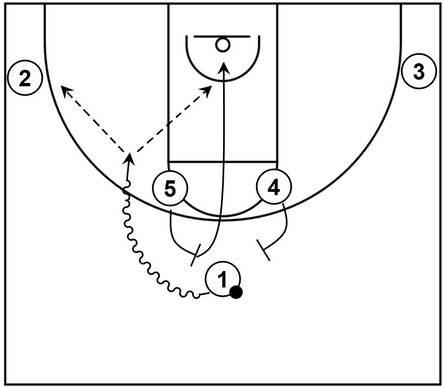
This is an example of a Horns pick and roll play that features an on-ball screen set near the top.
To start the play, 1 has the options to use the screen of either 4 or 5.
For this case, 1 uses the pick set by 5 and dribbles toward the basket from the left side of the court. Following that, 5 rolls to the rim and could receive the ball from 1.
Also, 2 could receive the ball from 1 and take the open three-point shot or 1 could retain possession the ball and take the mid-range shot instead.
Pick and roll play 2: Double ball screen
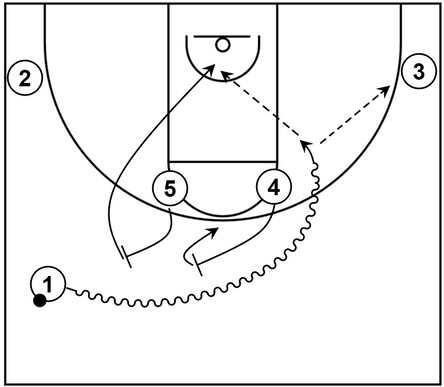
This is an example of a Horns pick and roll play that consists of double ball screen action.
In essence, 1 starts near the left sideline and begins to dribble towards the right side of the court via the double ball screen set by 4 and 5.
Afterwards, 1 continues to dribble towards the basket while 5 rolls and 4 pops out to the top area of the court.
From there, 5 could receive the ball from 1 if that is open. Alternatively, 3 could receive the ball for a potential three-point shot if that is also open.
Otherwise, 1 could keep possession of the ball and possibly take the mid-range shot.
Pick and roll play 3-1: DHO
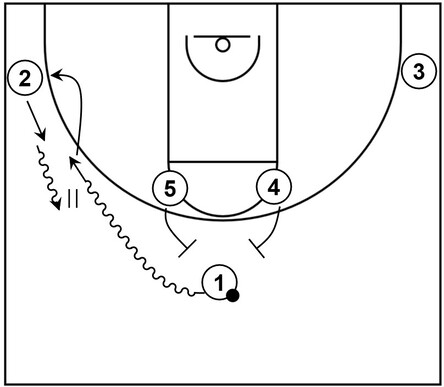
This play showcases dribble handoff action, also known as DHO, within Horns offense.
To start, 1 dribbles toward the left side wing via the pick set by 5. After that, 2 begins to move towards 1 and that is followed up by DHO action between 1 and 2, indicated by the double pipe symbol on the diagram.
From there, 2 simply dribbles back towards the adjacent left wing area while 1 replaces in the left side corner.
It should be mentioned as well that 2 should continue dribbling the ball, which will lead into the next portion of the play.
Pick and roll play 3-2: Wide pin down
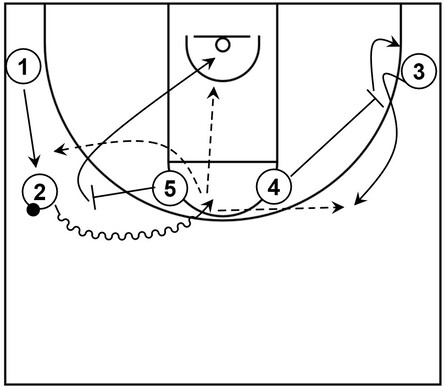
Next, 2 dribbles toward the middle of the high post area via the pick set by 5 who also rolls to the basket.
At the same time, 3 cuts to the right side wing area via a wide pin down screen set by 4 who fills the right side corner as well.
Additionally, 1 executes shake action by lifting back up towards the left side wing from the left side corner.
From there, 2 could pass the ball with either 1, 3, or 5 as potential recipients. Alternatively, 2 could keep possession and take the mid-range shot instead.
Pick and roll play 4-1: Elbow Get
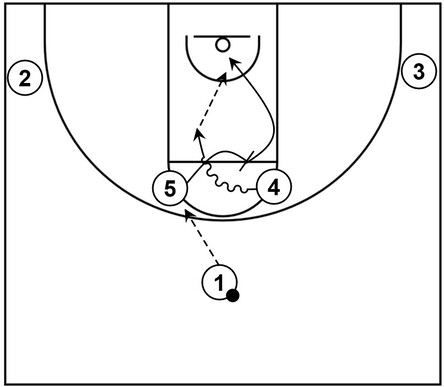
This play showcases basic elbow get action within Horns offense.
To start, 4 receives the ball from 1. After that, 5 cuts across the high post elbow to set a screen with 4 as the receiver.
From there, 4 uses that pick and begins to dribble towards the basket.
At the same time, 5 rolls to the basket and could receive the ball from 4, which could lead to a scoring opportunity.
Related: Basketball Plays: HORNS Elbow Get – YouTube
Flare screen plays
This section contains basketball plays that emphasize using a flare screen within the Horns offense.
Also, each of these plays are currently quick hitters that utilize a brief amount of passes, cuts, or screens to create one or more scoring opportunities.
Flare screen play 1: Double flare and slip option
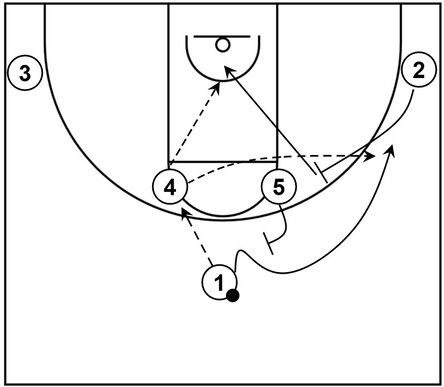
To begin this play, 4 receives the ball from 1 at the left side high post area.
Following that, 1 cuts towards the right side wing and as that happens, 5 and 2 set a double flare screen with 1 as the recipient.
Afterwards, 1 receives the ball again from 4 and takes the three-point shot.
Also, if the defender who would be guarding against 2 attempts to switch the screen, then 2 could slip to the basket, receive the ball from 4 instead, and score via a layup.
Flare screen play 2: Wide pin down, flare, and cross screen
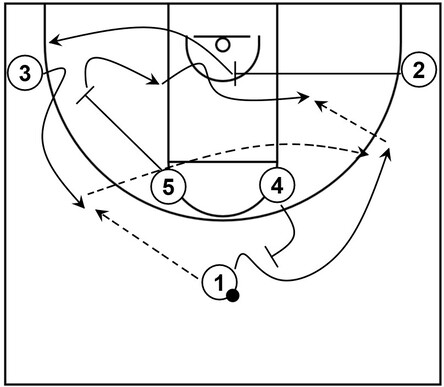
This play demonstrates a wide pin down, flare, and cross screen to create scoring opportunities.
To start, 3 cuts to the left side wing via the wide pin down screen set by 5 who also moves to the left side low post area after the screening action.
Next, 3 receives the ball from 1 and from there, 1 cuts to the right side wing via a flare screen set by 4.
3 throws a skip pass back to 1 who has an opportunity to take the three-point shot.
If 1 does not shoot, then 5 could cut across the lane to the right side low post area via the cross screen set by 2 who also happens to fill the left side corner subsequent to the screening action.
Following that, 5 could receive the ball from 1 and attempt to score via a low post move.
Flex screen plays
This section contains basketball plays that feature one or more flex screens utilized within the Horns offense.
Flex screen play 1-1: Pick and roll flex
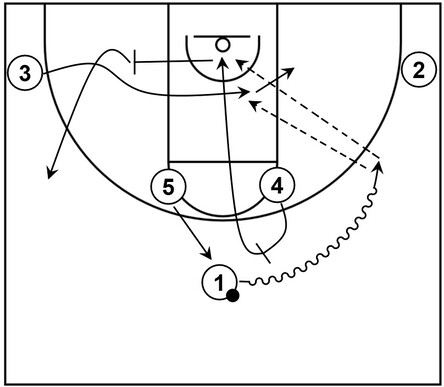
This play features pick and roll action followed by a flex screen, which could result in scoring opportunities around the basket.
To start, 1 dribbles toward the right side wing via the pick set by 4 who also rolls to the basket.
The first scoring option is 4 receiving the ball from 1 and if that is not open, then 4 cuts across the lane to set a flex screen with 3 as the recipient.
The second scoring option is 3 using the flex screen and cutting to the basket to receive the ball from 1.
If neither option is available, then 4 fills the left side wing, 3 occupies the right side low post area, and 5 pops out toward the top.
Flex screen play 1-2: Ball reversal and flex screen
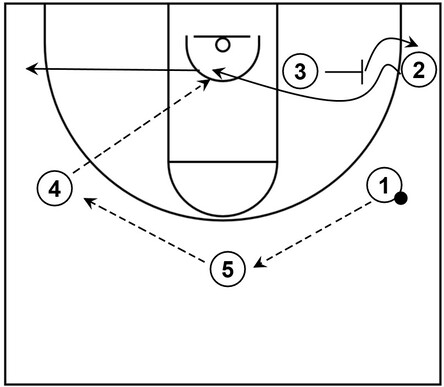
Next, ball reversal action occurs as 1 reverses the ball to 5 and then 5 reverses it again to 4.
Following that, 2 cuts to the basket via the flex screen set by 3 who also replaces at the right side corner.
Afterwards, 2 could receive the ball from 4 and score via a layup.
If that is not open, then 2 could continue to cut through to the left side corner.
Flex screen play 1-3: Stagger screen and slip option
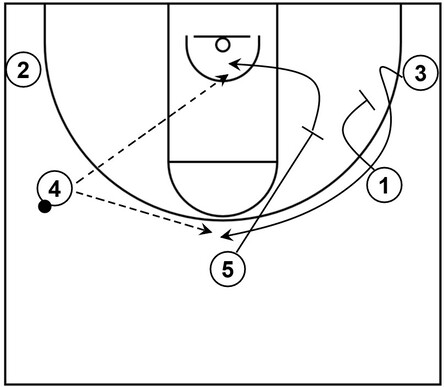
Once 2 fills the left side corner, 3 cuts to the top via a stagger screen set by 1 and 5.
From there, 3 could receive the ball from 4 and take the open three-point shot.
Alternatively, if the defender guarding 5 attempts to switch the screen, then 5 could slip to the basket, receive the ball from 4 instead, and score via a layup or dunk.
Flex screen play 2-1: Handoff
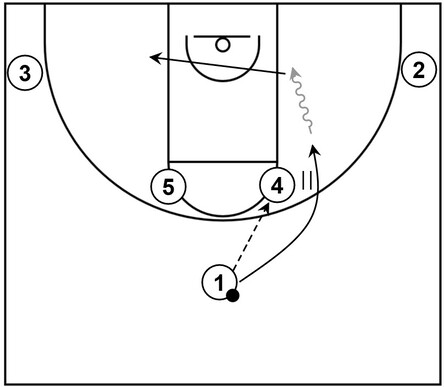
This play demonstrates a handoff and other actions within Horns offense.
To begin, 4 receives the ball from 1 who also cuts through on that same side to potentially receive the ball again via a handoff, represented by the double pipe symbol.
If 1 receives the ball, then 1 could simply dribble towards the basket, represented by the gray arrow, and score via a layup.
On the other hand, if 1 is not open to receiving the ball from 4, then 1 could simply cut through the lane to the left side low post area for the time being.
Flex screen play 2-2: DHO
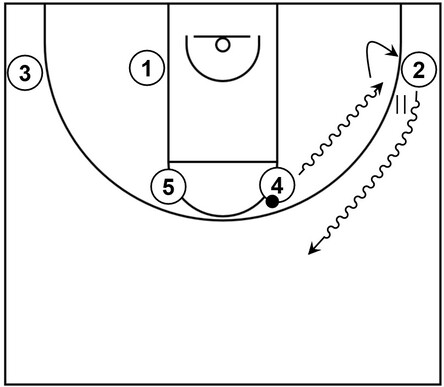
Next, 4 performs a dribble handoff with 2 who then dribbles back toward the right slot area that is above the three-point line between the top and the wings.
In addition, 4 occupies the replaces within the empty right corner after executing the DHO action.
Flex screen play 2-3: Flex and screen the screener
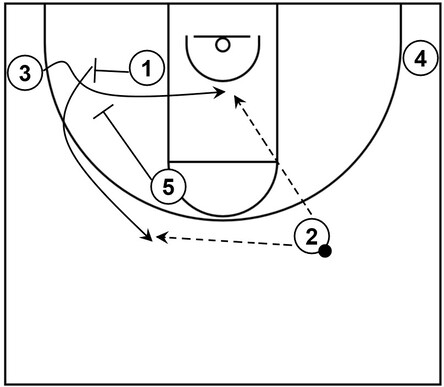
Continuing the overall action, 3 cuts to the basket via the flex screen set by 1. Following that, 3 could receive the ball from 2 and score around the basket.
Furthermore, as that happens, 1 could cut towards the left slot area via the down screen set by 5, which is also screen the screener action.
If 3 is not open, then as another alternative option, 1 could receive the ball from 2 and then possibly take the open three-point shot.
NCAA college basketball plays
This section includes examples of Horns offense plays from NCAA college basketball teams.
Duke Horns play 1-1: Wide pin down
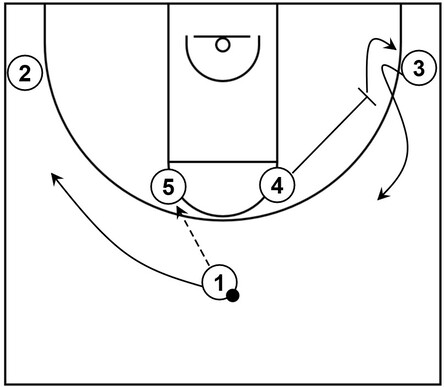
This play showcases a wide pin down as well as other actions within Horns offense derived from the Duke men’s college basketball team.
To start the play, 5 receives the ball from 1 and as that happens, 3 cuts to the right side wing via the wide pin down screen set by 4.
Furthermore, 1 cuts to the left side wing while 4 fills and replaces in the right side corner.
Related: Duke Blue Devils – Horns Elbow Handoffs – YouTube
Duke Horns play 1-2: DHO
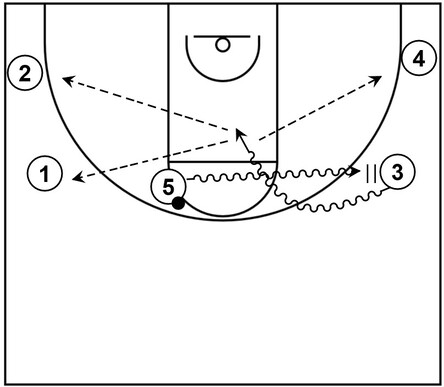
Next, 5 performs a dribble handoff with 3 who drives toward the basket. At that point, 3 could perform a kick pass to one of the other teammates located on perimeter spots on the court.
Alternatively though, 3 could continue to attack the rim for a scoring opportunity via a layup or dunk.
Michigan State Horns play 1-1: DHO and wide pin down
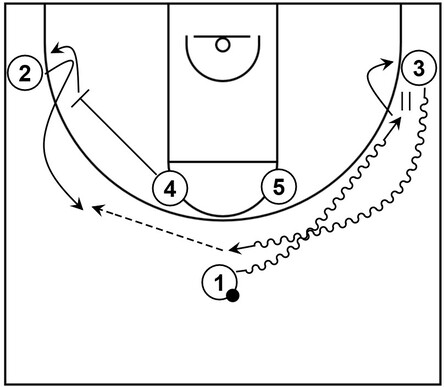
This play features a dribble handoff, wide pin down screen, and other actions within Horns offense derived from the Michigan State men’s college basketball team.
To begin, 1 performs a dribble handoff with 3 and while that happens, 2 cuts to the left side wing via the wide pin down screen set by 4.
Afterwards, 2 could receive the ball from 3 and take the three-point shot if that is available.
Otherwise, 2 could retain possession of the ball for the time being while 1 and 4 fill the respective empty corners.
Related: Michigan State “Horns” – YouTube
Michigan State Horns play 1-2: Back screen
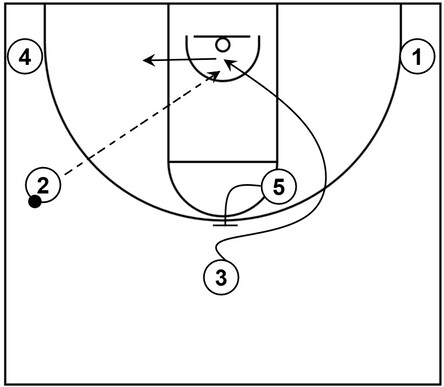
Next, 3 cuts to the basket via a back screen set by 5. Following that, 3 could receive the ball from 2 and score via a quick layup.
Otherwise, if 3 is not open to receive the ball, then 3 could simply cut out of the lane to occupy the left side low post area.
Michigan State Horns play 1-3: Spain pick and roll
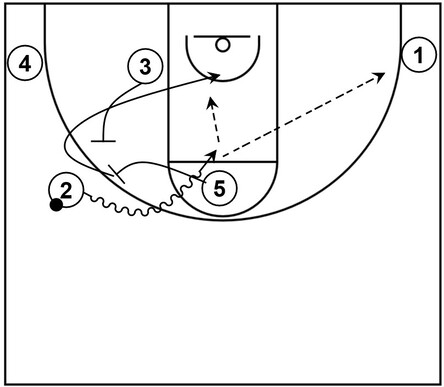
Continuing the play, 2 dribbles toward the rim via the pick set by 5.
As that happens, 5 rolls to the basket via the back screen set by 3, which is Spain pick and roll action as well.
From there, 2 could pass the ball to 1 or 5 for potential scoring opportunities. Alternatively, 2 could also keep possession of the ball and take the mid-range shot instead.
NBA plays
The section demonstrates examples of Horns offense plays derived from different NBA teams.
Hawks Horns play 1-1: Handoff and wide pin down
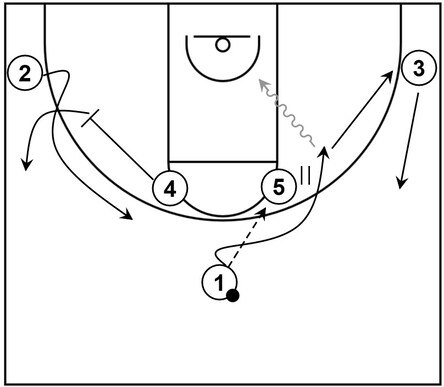
This basketball play shows a handoff and wide pin down among other actions within Horns offense derived from the Atlanta Hawks NBA team.
To start, 5 receives the ball from 1 who follows after for a potential handoff.
If 1 receives the ball again, then 1 could attack the rim, represented by the gray wavy arrow and score via a quick layup.
Otherwise, 1 could cut to the right side corner while 3 lifts up to the right side wing.
Meanwhile on the weak side of the court, 2 cuts to the left slot area via a wide pin down screen set by 4 who also fills the left side wing.
Hawks Horns play 1-2: DHO and roll

Next, 5 performs dribble handoff action with 2 who also begins to attack the rim while 5 rolls to the basket.
From that point, 2 could pass to other teammates for possible scoring opportunities or keep possession of the ball to take a potential mid-range shot.
Lakers Horns play 1-1: Wide pin down and reject
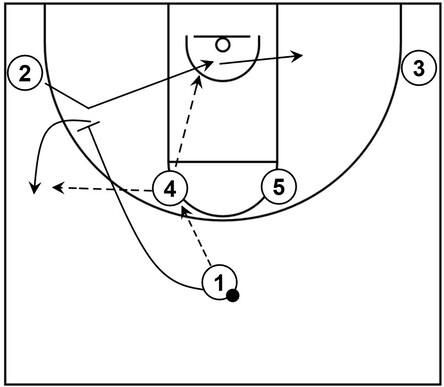
This play features a wide pin down screen that is rejected among other actions within Horns offense derived from the Los Angeles Lakers NBA team.
To begin, 4 receives the ball from 1 who then cuts over the top to set a wide pin down screen.
However, 2 rejects that screen and backdoor cuts to the basket looking to receive the ball from 4, which could lead to a possible layup.
Nevertheless, if 2 is not open, then 2 continues the cut through the lane to the right side low post area while 1 occupies the vacant left side wing and then receives the ball from 4 instead.
Related: Lakers Horns Strong Hand Off – YouTube
Lakers Horns play 1-2: Flex and double screen
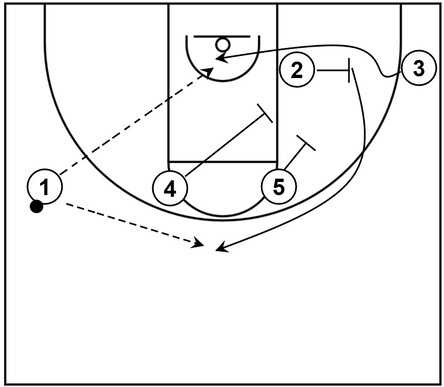
Next, 3 cuts to the rim via the flex screen set by 2 and could receive the ball from 1 to potentially score via a layup.
Alternatively, 2 could cut to the top by way of the double screen set by 4 and 5, which is also screen the screener action.
From there, 2 could receive the ball from 1 and take the three-point shot if open.
Continuity plays
This section demonstrates examples of continuity scoring options within the Horns offense that could be potentially useful for teams with three-point shooters and/or teams that have perimeter players that are above average in terms of slashing to the basket.
Continuity Horns play 1-1: Dribble entry and elevator screen
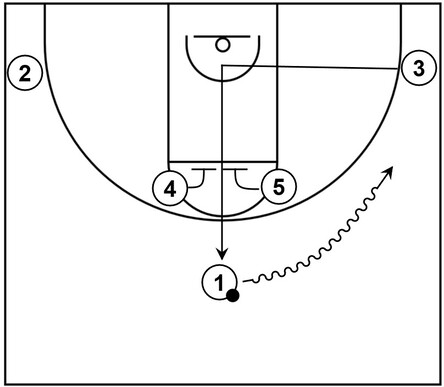
This continuity pattern utilizes an elevator screen in addition to wing isolation action to create possible scoring opportunities around the perimeter or near the basket.
It is derived from Encyclopedia of the Elevation Offense by Tyler Whitcomb.
To begin, 1 executes a dribble entry towards the right side wing. When that occurs, 3 initially cuts toward the basket and after that, 3 cuts to the top via the elevator screen set by 4 and 5.
Continuity Horns play 1-2: Wing iso option
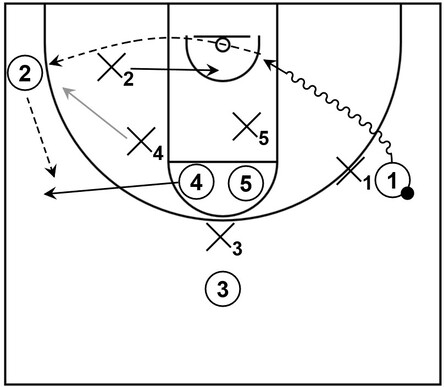
Next, while isolated on the wing, 1 could use one or more dribbling moves to get around the on-ball defender X1 and drive to the basket, preferably near the baseline side. Afterwards, 1 could score at the rim if possible.
Additionally, if X2 slides into the paint from the weak side to provide help defense, then 2 could receive the ball from 1 via a drift pass. Following that, 2 could take the three-point shot if open.
Furthermore, if X4 decides to execute a defensive closeout on 2 shown via the gray arrow, then 4 could pop out towards the wing area, receive the ball from 2, and then take the three-point shot if feasible.
Continuity Horns play 1-3: Opposite dribble entry, elevator, and wing iso option
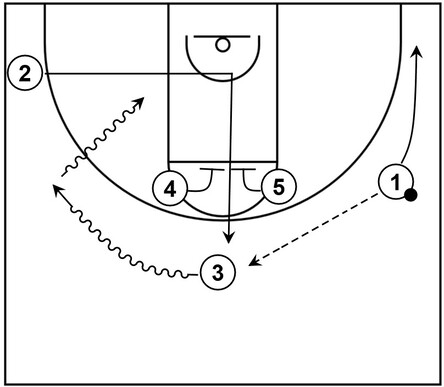
Conversely, if 1 does not drive towards the basket from the right side wing, then 3 could receive the ball from 1, which triggers the continuity pattern.
From there, if 3 happens to be open after going through the elevator screen, then 3 could take the three-point shot.
Otherwise, 3 executes a dribble entry towards the left side wing area. When that happens, 2 initially cuts toward the basket and then, 2 cuts to the top via the elevator screen set by 4 and 5.
Next, 3 could drive towards the basket, preferably near the baseline while 1 executes a drift cut towards the right side corner. Following that, 3 could potentially score at the rim with a layup or dunk.
Moreover, although it is not shown on the diagram, if the defender who is guarding 1 were to slide towards the lane to provide help defense, then 1 could receive the ball from 3 via the drift pass and take the jump shot if open.
In addition to that, if 3 does not drive to the basket, then 2 could receive the ball from 3. From that point, 2 could take the open shot or dribble towards the right side wing to execute the continuity pattern again.
Additional info about the Horns offense
General advantages for Horns offense
The Horns offense features good basketball spacing, particularly between the high post players and corner players on each respective side of the half court.
The Horns offense also opens up the low post areas, which could potentially keep the low post defenders of the opposing team away from the basket.
As a result, that could create scoring options by way of basketball cuts, dribble drive action and/or via kick passes to three-point shooters near the perimeter.
Furthermore, opening up the low post areas could be particularly helpful for an undersized basketball team or against defensive teams with above average shot blockers.
General roles for players within the Horns offense
In terms of the general roles for the players within the Horns offense, the point guard could attack the rim, especially on-ball screens.
In addition, the point guard could cut to the basket in certain instances or demonstrate play making abilities by creating scoring opportunities for open teammates near the perimeter or near the basket.
The power forward and center will typically set basketball screens, roll to the basket, pop to a perimeter spot, or pass to other teammates cutting to the basket or near the perimeter.
Additionally, the corner players are generally the team’s best perimeter shooters, particularly from three-point range. However, the corner players could also score around the basket with or showcase their play making skills by passing to other teammates for scoring possibilities.
More Horns offense resources
Horns Set Basketball Offense Plays that Work – YouTube
Horns Set Basketball Offense Plays that Work 2 – YouTube
The Best HORNS SETS from the NCAA TOURNAMENT – YouTube
Horns Basketball Offense Drills – YouTube
HORNS Offense – With Lason Perkins – Amazon
The Encyclopedia of the Horns Offense – Championship Productions